A slow website is painful to use, less engaging to visitors, and hurts your search engine rankings. I’ll walk you through the tools I use to identify performance problems, and provide ten tips to improve your website’s performance.
You don’t need a WordPress Developer
I’ve written this article to help website owners improve their website’s performance on their own. You can implement most of these changes yourself or with your website host’s help.
You should see substantial speed improvements after implementing even a few of these recommendations. You don’t need to do everything on this list.
If you need help implementing these performance improvements, I recommend you speak with WP Buffs. They specialize in speeding up WordPress websites and keeping them fast over the long term.
If you would like a performance-focused redesign of your website, please contact me. Here’s some information on our process.
Quick Links to the Ten Tips
- Caching
- Image Compression
- High Quality Hosting
- Plugin Audit
- Minify CSS and JS
- Cache static content
- Use a CDN
- Clean up options table
- Decrease markup
- Decrease external requests
Before we get to the tips, I’d like to describe what makes a website slow. I’ll then show you how to diagnose what’s wrong with your website so you know which of these tips will be most effective.
What makes a WordPress website slow?
I like to break performance issues into two groups:
Backend Issues
I describe “backend issues” as issues that happen before and during the page generation on the server.
WordPress is a database-driven content management system. Your home page doesn’t exist as a static file on your server. It’s dynamically built using theme files, plugins, and database queries (ex: building menus, post content, sidebar widgets…).
Backend performance issues are usually caused by:
- Poor hosting
- Overloaded server
- Complicated queries
- Poorly written theme / plugins
In the performance report described below, a long Time To First Byte (TTFB) indicates backend issues. TTFB records the time from the initial request to when your server is done processing and starts sending data to the visitor.
The easiest improvements are to get better hosting and eliminate unnecessary plugins. Beyond that, these issues become more difficult for a non-technical person to solve on their own. Luckily you can cover up much of your backend issues with full page caching.
Frontend Issues
I describe “frontend issues” as issues that occur while the page is loading. These issues are usually caused by:
- Large file sizes (images, CSS, JS)
- Many files
- Slow delivery
These issues are easier to identify, and some are simple to solve, like compressing images, minifying CSS, and removing unnecessary plugins. It becomes more difficult when your “necessary” plugin list is long and they’re responsible for most of your issues.
Diagnosing issues
WebPageTest is my favorite frontend performance testing tool. You can drop in the URL of any website and get specific recommendations on improvements. You can also use Pingdom for a similar report.
Here’s an example of a speed test of my website.
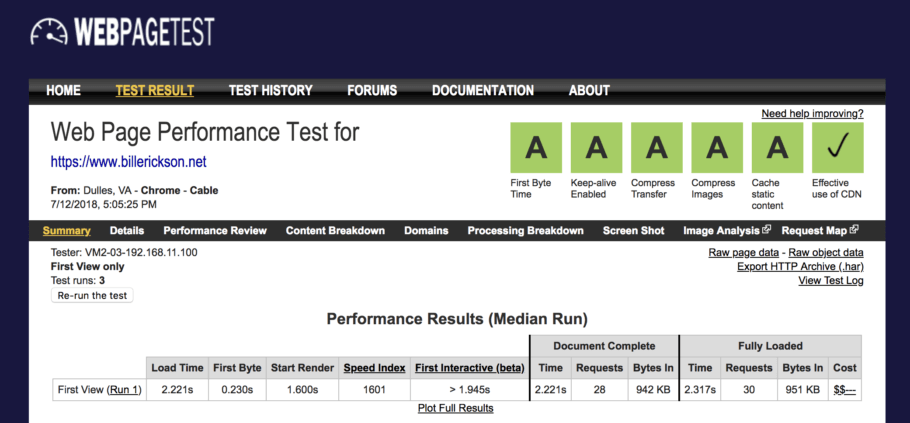
They include letter grades at the top to summarize the results (A and B are good, D and F are bad). If you have a D or F for “First Byte Time”, that means you have backend issues. The rest are frontend / hosting issues.
Also pay attention to the “Fully Loaded” section. This summarizes the total time for your website to load, number of requests (different files that were loaded), total file size of the page, and a “cost” of delivering a site of that size (you want as few dollar signs as possible).
P3 Profiler lets you do a backend performance test of your site, focusing on the impact each plugin and your theme has on the load time. This is a great tool to quickly identify which plugins are causing issues.
Query Monitor lets you quickly see the number of queries run on a page, and how long each took to run. You can filter them by type, component (WP core, specific plugins) and sort by most time consuming.
10 ways to speed up your WordPress website
1. Caching
The simplest change most WordPress websites could benefit from is to use full page caching.
As described above, WordPress goes through a lot of work to build each page of your site. Every time someone asks to see your homepage, it does many queries and runs lots of code across WP core, your theme, and your active plugins.
But most of the time the page doesn’t change – it’s the same as the last time it was requested. Instead of generating it fresh for every visit, you can build it once, cache it, and serve the cached file every time someone requests that page. The cache expires periodically (every few hours), and is automatically cleared any time you edit the page.
Even if you have serious backend performance issues, most of your users won’t notice since they’re not interacting with your database at all – they’re downloading the static copy of your site. That isn’t to say you can ignore backend performance issues, but hiding it with caching can be a short-term solution.
High quality hosts like WPEngine have full page caching built-in, but on other hosts you’ll want to use WP Rocket (my recommendation, $39) or W3 Total Cache (free).
Even with WPEngine, I recommend WP Rocket because it addresses many of the other performance tips listed below.
If you’re a WordPress developer, I recommend you also consider fragment caching for complex queries or external API requests. While the full page cache might get rebuilt 5-10 times a day, you can cache the most expensive queries for longer using a transient, specifying exactly how often you want to refresh it. Here’s a great article on WordPress transients.
Let’s say your homepage uses a complex query to gather featured posts. Instead of running this every time the homepage is built, you could use a transient to refresh it once a day.
2. Image Compression
This is such an easy win! Most websites are using large, uncompressed images. You can reduce the image file size by 20-80% with no visual change. WebPageTest will tell you your potential savings from compression on the performance review tab (screenshot).
Go to your website right now and save an image. Then go to TinyPNG.com and upload it. See how much you could save. Now download the compressed image and open it with the original. Can you tell a difference?
You could manually upload every image to TinyPNG and download it before uploading it to your site, but that’s a hassle. I recommend installing the TinyPNG WordPress plugin and getting an API key. You get 500 free compressions per month which is plenty for most of my clients. You can also try other plugins like Optimus, WP Smush, and Imagify.
If you’re loading lots of images on your pages, you may consider lazy loading, which will wait to load the image when the visitor is close to seeing it.
You should also make sure you’re loading properly sized images throughout your site. I saw a site once with an archive page that had 300px wide images, but it was loading the original image file which was often 1600px wide or more.
3. High Quality Hosting
Your website can only be as fast as the server you host it on. If you’re using cheap, generic, $2/month hosting, you could follow all of these tips and still have trouble reaching the level of performance you’d like.
I recommend using a WordPress managed host like WPEngine ($35/month), LiquidWeb ($99/month), or SiteGround ($12/month). Here’s more information on my hosting recommendations.
Make sure your host is using PHP 7 or higher. Upgrading to PHP 7 will give you a large performance boost without any other changes on your site. Use the Display PHP Version plugin to find out what version of PHP you currently have, and the PHP Compatibility Checker plugin to ensure your current theme and plugins are compatible.
4. Plugin Audit
You’re probably aware that some of your plugins are causing performance issues, but not sure which ones. You can do a simple plugin audit yourself, or hire a WordPress developer, or ask your website’s host. Here’s Chris Lema from LiquidWeb:
First, clone your site to a staging environment. This will allow you to test changes without affecting your live website.
Go to the plugins page in the backend of your website. Deactivate any plugins you no longer use. Make a list of the active plugins that are absolutely essential to your site (ex: your membership plugin), those that provide a feature you need but aren’t necessarily unique (ex: social sharing plugins), and those that are optional.
Use P3 Profiler to see how each plugin affects the load time of your site. Also view the source code of the key pages on your site and search for wp-content/plugins to see the number and size of the CSS and JS files loaded by that plugin.
Browse your staging site with Debug Bar and Query Monitor, looking for errors and large / excessive queries. Dig into the details to determine which plugins are responsible for these errors & queries.
Remove all of the optional plugins that negatively affect performance or are loading too many assets. For the non-unique plugins that negatively affect performance, research other plugins that could provide similar functionality.
Using the staging site, disable plugins to see their affect on your site. Try installing alternative plugins and re-running your performance tests to see the effect of the change.
Sometimes you’ll be lucky and the results are straightforward. Some unused plugin is responsible for 80% of your load time, so you simply remove it. Other times you may need to hire a WordPress developer to do more extensive auditing and make recommendations for improvements.
Here’s a list of the plugins I use on most websites, which help maintain or improve the overall performance of the site.
5. Minify CSS & JavaScript
Once you’ve eliminated all the plugins you don’t need, it’s time to optimize the ones you have.
Plugins and themes load CSS and JS files to implement their functionality. They often leave these files “human readable” with lots of space and inline comments. This increases the file size you’re serving up for no good reason – your site visitors don’t need to read the CSS or JS files. To “minify” the files is to remove the extraneous data, often reducing the file size by 25-50%.
Some caching plugins will minify files for you, like WP Rocket. You can also use a separate plugin for this, like Autoptimize. If you’re using CloudFlare as a CDN (see below), they will also minify your assets for you.
You should have no problem combining CSS files. JavaScript files can be a bit more tricky. You may have conflicts combining certain JavaScript files. Some plugins may be adding JavaScript in the head of the page, but your combined file appears in the footer, which causes the plugin’s functionality to not work. If you do plan to combine JS files, test it extensively on your staging site.
6. Cache static content
Now that we’ve minimized the size and number of assets loading on your site, we should tell browsers to keep those locally cached for a long time.
If you’re using WP Rocket, it will take care of this for you. If you need to manually implement it yourself, add the following to your .htaccess file, or ask your host to do it for you:
<IfModule mod_expires.c>
ExpiresActive On
ExpiresByType image/gif A31536000
ExpiresByType image/jpg A31536000
ExpiresByType image/jpeg A31536000
ExpiresByType image/png A31536000
ExpiresByType image/bmp A31536000
ExpiresByType text/css A31536000
ExpiresByType text/javascript A31536000
ExpiresByType application/javascript A31536000
ExpiresByType application/x-javascript A31536000
</IfModule>
7. Use a CDN
Your images, CSS, and JS files represent the majority of your site’s file size. You can deliver these much faster by offloading them to a CDN. A Content Delivery Network (CDN) is a geographically diverse group of servers designed specifically to deliver assets like these.
CloudFlare offers a CDN as part of their free plan. They also offer many other performance-enhancing features, so are worth reviewing. Here’s a detailed article reviewing CloudFlare’s performance offerings.
WP Rocket integrates directly with CloudFlare, so if you’re using WP Rocket, follow this tutorial to set up Cloudflare CDN. WP Rocket also integrates with many other CDNs.
If you’re using WPEngine for hosting, they include an optional CDN with all their plans. Here’s more information on WPEngine’s CDN, and information on integrating WPEngine’s CDN with WP Rocket.
Jetpack also includes a CDN for images, but not your other assets. If you’re using this plugin, make sure “Serve images from our servers” is checked (it’s on by default). Here’s more information about Jetpack’s Image CDN.
8. Clean up options table
This is a technical change that should only be done by a developer.
The options table is where WordPress core and plugins store site-wide data. Much of this data is set to “autoload”, which means it is loaded on every page of your site.
On older sites you’ll often find the options table filled with data for plugins no longer active. When I’m redesigning a site, I try to always review the options table and prune out the data associated with plugins no longer used.
The best place to start is to find large options and the largest autoloaded options. Here’s an example of the 10 largest autoloaded options on a site I’m redesigning, and what I’m planning to remove:

- Remove GooglePublisherPlugin – This is by far the largest option, ten times larger than #2. This plugin isn’t even installed on the site and looks like it’s no longer active.
- Keep rewrite_rules – This is a core WordPress option that tells WordPress how you’d like your permalinks.
- Keep wp_ubwqqt_user_roles – This is a core WP option that describes the roles for registered users in the site
- Remove yuzo_related_post_options – We’re building our own related posts query in the theme and won’t be using the Yuzo plugin.
- Remove redux_builder_amp – We’re not using the AMP plugin that created this option
- Keep widget_custom_html – This is a core WP option
- Keep wpseo_titles – This is set by Yoast SEO (formerly WordPress SEO)
- Keep cron – This is a core WP option
- Remove mashsb_settings – We replaced the Mash Share Buttons plugin with Shared Counts
- Remove sm_options – This is from an unused plugin (Google XML Sitemaps), which the client replaced a while ago with similar functionality in Yoast SEO
9. Decrease markup
One often overlooked area of optimization is the HTML markup. View the source of your key pages and look at the underlying markup. Are you surprised by how much HTML is associated with certain features of your site? Could those features be built more efficiently, or are they necessary at all?
WordPress is quite generous with the CSS classes it provides, and they can add up. I worked on a website a few years ago that had a large menu (about 80 items), and roughly 30% of the overall HTML markup was just the menu. By decreasing the unnecessary CSS classes, we were able to drastically shrink the markup.
Depending on the situation, I whitelist menu item classes or blacklist menu item classes. The blacklist approach ensures the “Custom CSS Class” feature in the menu editor continues to work, so is best if you are adding custom classes. You can do the same for post classes.
Once you’ve removed the unnecessary markup, you can compress the remaining HTML using WP Rocket or Autoptimize. Like CSS/JS minification, HTML often has extra space and comments that be safely removed, reducing the size of the page without removing any actual HTML markup.
10. Decrease external requests
One final way to improve the speed of your site is to reduce the requests your site makes for external resources. You should try to reduce total requests on your site as well, but external requests require an additional DNS lookup and you can’t improve the speed of a resource you don’t control.
When doing a performance review of a client site recently, we found their Twitter widget showing recent tweets was slowing the site down quite a bit. It was loading lots of images, about 30 totaling 2.9MB. By removing the Twitter widget we dropped the page size by more than 50% and cut the page load time to less than 2 seconds.
If you have Gravatars enabled (Globally Recognized Avatars), you could be loading a separate image for every comment on your site, drastically increasing the size and load time of your popular posts. Here’s how to disable avatars in comments.
Many social sharing plugins load their buttons directly from the social networks, increasing the number of external requests. Shared Counts uses on-site buttons and leverages smart caching to to minimize the number of requests required to retrieve share counts.
You can use the Domains tab of the WebPageTest report to see the number of requests you’re making across each domain.
Your Turn
Do you have any tips to improve site speed? Share them in the comments below.
Matt Poole says
Some good tips here. It’s surprising how often the hosting part is overlooked. I’m surprised that in 2018 there are still hosts deploying clients to environments unfit to host WordPress sites. We long moved all of our hosting clients over to full SSD, alongside server-caching and fully optimised settings and have seen huge, 500%+ improvements in page load across the board (rackx.io)
Roy says
Hi Bill I think you are right about options table, cuz everyone forgot it. Mostly always is heavy.
Please also try the new minify plugin:
https://wordpress.org/plugins/minify-html-littlebizzy/
(part of next Speed Demon release 1.2.0)
Roberto says
That plugin seems to have been removed because it was uploaded to the repository by a scammer by the name of Jessie (or Jessica)
Joachim says
Hi Bill,
Thanks for your post.
You are right, the Google Publisher plugin is deprecated and has been removed from the WordPress repository in 2017. Google AdSense recommends the free and lightweight plugin Advanced Ads instead: https://wordpress.org/plugins/advanced-ads/
If you want to learn more about page speed and ads as well as about some tricks to improve it with Advanced Ads, please, take a look at this little case study that has been published on WP Rocket: https://wp-rocket.me/blog/how-to-lazy-load-ads-on-your-wordpress-site/