After building a few AMP sites for clients, I was surprised by how easy it can be to build a completely custom theme that’s AMP compatible.
I spent an hour yesterday converting this website to native AMP. You can check the AMP validator to see my posts are valid AMP pages.
I’ll walk you through the basics of setting up an AMP site, discuss areas that tripped me up, and provide some helper functions to make AMP site development easier.
Quick Links
- What is AMP?
- AMP WordPress plugin
- Three AMP template modes
- Fixing Validation Issues
- Plugins without JavaScript
- Navigation without JavaScript
- Google Analytics with AMP
- AMP helper functions
What is AMP?
AMP is Google’s approach to dramatically speeding up the display and development of websites (more info).
AMP uses a limited and restricted form of markup they call AMP HTML. It also limits the amount of CSS you can have on a page to 50kb, and no JavaScript.
With Cloudflare you can display your Real URL rather than the Google URL for your AMP cached website.
Why should you use AMP?
- AMP forces you to build an incredibly fast website, which helps your SEO because speed is a ranking factor.
- Google makes those pages load even faster with pre-rendering, so when a user clicks your link it feels like an instantaneous, 0 second load time.
- Google may reward you with placement in the Top Stories carousel above search results.
- The AMP WordPress plugin includes a CSS Tree Shaker, which can drastically reduce the amount of CSS loaded on a page. This page is only loading 35% of my CSS.
AMP WordPress Plugin
The official AMP plugin takes care of most of the hard work. It converts your site’s markup to AMP HTML when viewing the AMP version of your site, so you only have to maintain standard HTML markup in your theme.
It also includes CSS Tree Shaking, which determines exactly what CSS is needed on the current page and creates a page-specific stylesheet with just those styles. When you view the source of an AMP page, it includes a comment at the top showing you the breakdown of CSS:
<!--
The style[amp-custom] element is populated with:
     0 B: style[amp-custom=]
    73 B (57%): link#amp-default-css[rel=stylesheet][id=amp-default-css][href=https://www.billerickson.net/wp-content/plugins/amp/assets/css/amp-default.css?ver=1.1.3][type=text/css][media=all]
   998 B (14%): link#shared-counts-css[rel=stylesheet][id=shared-counts-css][href=https://www.billerickson.net/wp-content/plugins/shared-counts/assets/css/shared-counts.min.css?ver=1.3.0][type=text/css][media=all]
   196 B (1%): link#wp-block-library-css[rel=stylesheet][id=wp-block-library-css][href=https://www.billerickson.net/wp-includes/css/dist/block-library/style.min.css?ver=5.2.1][type=text/css][media=all]
 18786 B (50%): link#ea-style-css[rel=stylesheet][id=ea-style-css][href=https://www.billerickson.net/wp-content/themes/billerickson-2019/assets/css/main.css?ver=1559684395][type=text/css][media=all]
  2664 B (23%): link#gistpress-css[rel=stylesheet][id=gistpress-css][href=https://github.githubassets.com/assets/gist-embed-a9a1cf2ca01efd362bfa52312712ae94.css?ver=5.2.1][type=text/css][media=all]
    74 B: a.monsterinsights-outbound-link amp-wp-1982de1[href=https://gist.github.com/billerickson/6c9fa9c3bce739f551685cfa3b6bf369/raw/9c04eb1e7b1a1f82fea7f5d87b3b6acd9e8e8c79/navigation.php][class=monsterinsights-outbound-link amp-wp-1982de1][data-vars-category=outbound-link][data-vars-action=https://gist.github.com/billerickson/6c9fa9c3bce739f551685cfa3b6bf369/raw/9c04eb1e7b1a1f82fea7f5d87b3b6acd9e8e8c79/navigation.php][data-vars-label=view raw]
    80 B: div.amp-wp-539b047[class=amp-wp-539b047]
Total included size: 22,871 bytes (35% of 65,101 total after tree shaking)
-->
It adds a “Validate AMP” item to the admin bar so you can quickly see if the current page is valid or invalid:


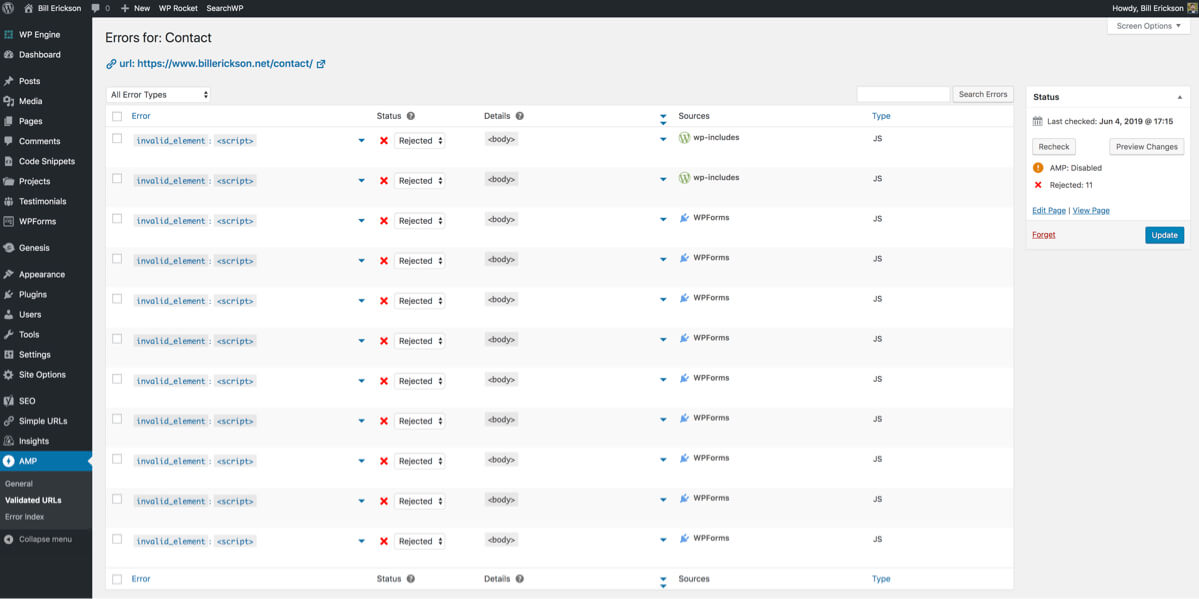
It also adds an “Error Index” in the backend that lets you track down which pages have errors and what plugin or theme is causing it.
The errors shown below are from an old version of WPForms. The current version has full AMP compatibility, so all my pages with forms are fully AMP compatible.
Three AMP template modes
When you first install the AMP plugin, you’re asked which template mode you’d like to use.
Native is the recommended approach, and means you serve only AMP pages to all visitors. Your canonical URL is AMP, and there’s no non-AMP versions of your pages. This requires the most work to implement because you have to meet the strict AMP requirements on your website that all users access.
You can use native even when serving a mix of valid and invalidated pages (see below). This tutorial focuses on using the native template mode.
Transitional lets you maintain your canonical URL as non-AMP, and create a paired AMP page using your own template files. Adding ?amp to the end of a URL serves up the AMP version used in Google’s mobile SERPs. This is a good option if you’re not able to fully implement your website in an AMP compatible way but want a paired down AMP version that still looks like your website. It’s named transitional because you can use it until you can make a Native AMP version.
Reader is the most basic option. Your main (canonical) URLs are non-AMP and use your theme, but the paired AMP version uses a completely different theme provided by the AMP plugin.
Fixing Validation Issues
When you first install AMP and turn on Native mode, it will run a few pages through the validator. You’ll likely have errors from your theme and plugins loading JavaScript.
When I converted my site to AMP, I started by going through the plugins and figuring out what changes were necessary to ensure AMP compatibility.
I then went through the JavaScript files in my theme to determine what I could live without (Recommended Reading on the right no longer floats next to content), what I’d leave in place as invalid pages (live search on Code Snippets), and what I needed to rebuild without Javascript (my mobile menu).
Plugins without JavaScript
Any time you install a plugin, AMP re-runs the validation on a few key pages to see if it broke anything. You’ll often be notified of validation errors because the plugin included JavaScript.
When a validation error occurs, you have a few options to consider:
Reject validation error, leave page invalidated
If it only affects a few pages, you should consider the costs & benefits of leaving the page invalidated.
By default, the AMP plugin will sanitize validation errors, removing the JavaScript, but you can “Reject” the validation error from being sanitized.
The page will technically no longer be an AMP page (the amp attribute is removed from the HTML element), but you can still benefit from all the performance improvements and AMP components already on the page.
It won’t hurt your SEO or make the site inaccessible to users.
A contact form is a good example. Many contact form plugins use JavaScript for field validation, conditional logic, spam protection, and more. Your contact page will never appear in a news carousel, so the cost of your contact page being invalidated is minimal. The benefit of including a form on your contact page is high.
However, if your form appears in every post (like my Newsletter Signup form) you will need to use an AMP-compatible form plugin like WPForms.
Disable JS in the plugin
Many plugins that include JavaScript will provide some method of disabling it using a filter. Before you disable the JavaScript, I recommend reading through it to see exactly what it does so you know what features won’t work without it.
I use Shared Counts for social sharing buttons on articles, which loads a JavaScript file for the following features:
- Resizing the popup windows. When you click the Twitter icon, the new window is small and sized appropriately for the tweet.
- Email Sharing. If you use the “Share by Email” button, it creates a popup with an email sharing form.
- Social Tracking in Google Analytics. When someone clicks a sharing button, it triggers a Google Analytics event so you can track your social shares in GA.
I’m not using the Email Sharing button, and the other JS feature aren’t super important to me. Here’s how to disable JavaScript in Shared Counts (more information):
add_filter( 'shared_counts_load_js', '__return_false' );Note: Shared Counts will soon be AMP compatible, so you’ll get all the technical benefits (email sharing, social tracking…) without having to make any code changes on your AMP site.
On a client site, I used a similar approach to disable JavaScript in Yoast Local SEO:
add_filter( 'wpseo_local_load_jquery', '__return_false' );On another client website we used the Page Links To plugin for a few redirects. It loads a global JavaScript file for opening a redirect in a new window if you have that selected in the backend. We disabled the JavaScript because we didn’t need that feature.
I’m using my helper function ea_is_amp() to only disable it if AMP is active.
/**
 * Remove scripts
 *
 */
function ea_amp_remove_scripts() {
	if( ! ea_is_amp() )
		return;

	wp_dequeue_script( 'page-links-to' );
}
add_action( 'wp_enqueue_scripts', 'ea_amp_remove_scripts', 20 );
Build the functionality without a plugin
You can’t always remove the JavaScript from a plugin – it’s often vital to the functionality.
If you’re building a Native AMP website, be prepared to custom build features that you otherwise might have used a plugin for.
There’s a huge number of AMP components you can use to build your own custom functionality. For instance, in the upcoming Shared Counts release for AMP compatibility we are using amp-lightbox, amp-form, amp-moustache, and amp-recaptcha-input to build the email sharing popup and form.
You might find it easier to build functionality with AMP than without because you can leverage all of these pre-built components. To make a modal popup window, simply enqueue the amp-lightbox script and wrap your modal content in <amp-lightbox layout="nodisplay">
Navigation without JavaScript
My typical mobile menu toggles CSS classes when a user clicks the mobile menu icon or a submenu expanding icon.
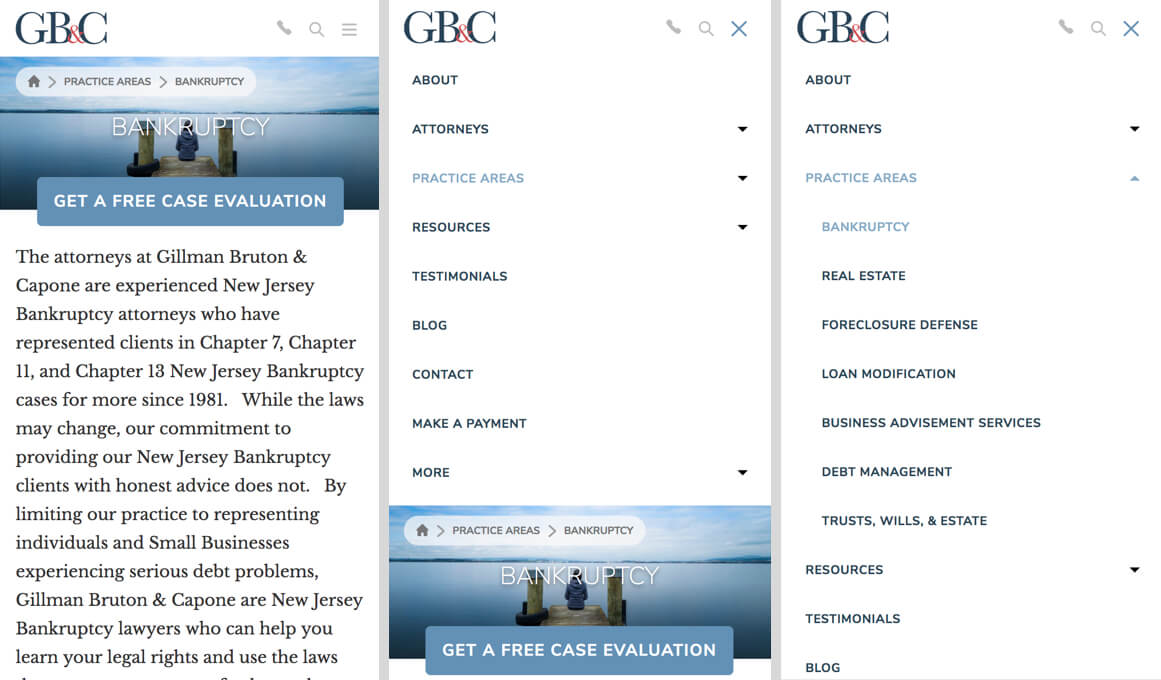
You can replicate this functionality using AMP.setState(). Start by building your element in the default state. In this case, I have a mobile menu toggle button:
<button class="mobile-menu-toggle"></button>We’ll then use [class] to specify how the class should change based on a variable mobileMenuActive. If that variable is true then the button should have a class of mobile-menu-toggle active, and if it is false it should have a class of mobile-menu-toggle.
<button [class]="mobileMenuActive ? 'mobile-menu-toggle active' : 'mobile-menu-toggle'" class="mobile-menu-toggle"></button>Then when the button is tapped, set the value of mobileMenuActive to the opposite of its current value. In other words, if the mobile menu is inactive, on tap it should become active.
<button [class]="mobileMenuActive ? 'mobile-menu-toggle active' : 'mobile-menu-toggle'" class="mobile-menu-toggle" on="tap:AMP.setState({mobileMenuActive: !mobileMenuActive})"></button>Finally, let’s toggle a class on the menu itself, adding a class of active if mobileMenuActive is true.
<nav [class]="mobileMenuActive ? 'nav-primary nav-menu active' : 'nav-primary nav-menu'" class="nav-primary nav-menu"></nav>This can get a bit confusing, so I wrote some helper functions to simplify the code (see below). My mobile menu toggle now looks like:
echo '<button' . ea_amp_class( 'mobile-menu-toggle', 'active', 'mobileMenuActive' ) . ea_amp_toggle( 'mobileMenuActive' ) . '></button>';And my nav menu looks like:
echo '<nav' . ea_amp_class( 'nav-primary nav-menu', 'active', 'mobileMenuActive' ) . '></nav>';Submenu Toggles
We use the same approach for submenu toggles, but each one updates a different variable so you know which submenu is open.
I use walker_nav_menu_start_el to add my submenu toggle to any menu item that has children.
/**
 * Add a dropdown icon to top-level menu items.
 *
 * @param string $output Nav menu item start element.
 * @param object $item   Nav menu item.
 * @param int    $depth  Depth.
 * @param object $args   Nav menu args.
 * @return string Nav menu item start element.
 */
function ea_nav_add_dropdown_icons( $output, $item, $depth, $args ) {
	// Only add to 'primary' menu.
	if ( ! isset( $args->theme_location ) || 'primary' !== $args->theme_location ) {
		return $output;
	}
 	// Only add to items with children
	if ( in_array( 'menu-item-has-children', $item->classes, true ) ) {
		// Add SVG icon to parent items.
		$icon = ea_icon( array( 'icon' => 'drop-down', 'size' => 24 ) );
		$output .= sprintf(
			'<button' . ea_amp_nav_dropdown( $args->theme_location, $depth ) . ' tabindex="-1">%s</button>',
			$icon
		);
	}
	return $output;
}
add_filter( 'walker_nav_menu_start_el', 'ea_nav_add_dropdown_icons', 10, 4 );
I’m also using a helper function (shown below) for generating all the AMP code with a unique variable based on the theme location, submenu index, and depth.
When a submenu toggle is clicked, its class changes to .submenu-expand.expanded. We then display the sub-menu with the following CSS:
.submenu-expand.expanded + .sub-menu {
	display: block;
}
Add Fallback JavaScript
For simple yet important features like navigation, it’s a good idea to provide a JavaScript fallback in case AMP is ever disabled.
You can see the global.js file in my starter themes for the JavaScript I am using. I only load global.js if ! ea_is_amp().
If the AMP plugin is disabled, the JavaScript file loads and the navigation still works.
Genesis makes it easier
This is one of the areas where Genesis simplifies AMP development. Genesis 3.0 includes AMP integration as a key feature.
Rather than adding all the code above yourself, you can use the genesis_register_responsive_menus() to tell Genesis to add it for you.
// Registers the responsive menus.
genesis_register_responsive_menus(
	array(
		'script' => array(
			'menuIconClass'       => 'ionicons-before ion-ios-menu',
			'menuIconOpenedClass' => 'ionicons-before ion-ios-menu',
			'subMenuIconClass'    => 'ionicons-before ion-ios-arrow-down',
			'menuClasses'         => array(
				'combine' => array(
					'.nav-primary',
					'.nav-off-screen',
				),
				'others'  => array(),
			),
		),
	)
);
You can use this feature right now if you’re using the latest version of Genesis.
Google Analytics with AMP
Analytics with AMP is tricky. You can’t simply drop your Google Analytics code in your site because it’s JavaScript.
There’s an AMP component built specifically for this, amp-analytics, which can be used for Google Analytics or any other analytics tool. You specify your analytics settings and triggering events in a JSON object.
If you have the AMP for WordPress plugin installed, go to AMP > Analytics to configure (screenshot).
Alternatively, you can use Monster Insights Pro which is 100x easier. Their AMP addon will automatically generate the correct analytics code for you, and it will include all of the additional tracking they provide (ex: form conversions, file downloads, outbound links…).
Monster Insights also includes Session Unification for when a visitor goes from an AMP page to a non-AMP page on your site, if you’re using Transitional or Reader mode.
I use Monster Insights for my website and recommend it to my clients.
AMP Helper Functions
To simplify the readability and re-usability of the AMP-specific code on this website, I built the following helper functions. These can be found in /inc/amp.php in both of my starter themes.
ea_is_amp()A conditional to use when applying AMP-specific changes. For instance, for enqueuing a JavaScript file ifea_is_amp()is false.ea_amp_class( $default, $active, $state )This adds all the code for toggling CSS classes based on a state variable.ea_amp_toggle( $state, $disable )This adds the state variable toggle code, so when a button is clicked the variable toggles true/false. You can also pass an array of other state variables to set to false on click (ex: close the search form when opening the mobile nav)ea_amp_nav_dropdown( $theme_location, $depth )Generates a unique variable name for submenu toggles, then uses it withea_amp_class()andea_amp_toggle().
<?php
/**
 * AMP functionality
 *
 * @package      EAStarter
 * @author       Bill Erickson
 * @since        1.0.0
 * @license      GPL-2.0+
**/

/**
 * Is AMP?
 * Conditional tag
 */
function ea_is_amp() {
	return function_exists( 'is_amp_endpoint' ) && is_amp_endpoint();
}

/**
 * Generate a class attribute and an AMP class attribute binding.
 *
 * @param string $default Default class value.
 * @param string $active  Value when the state enabled.
 * @param string $state   State variable to toggle based on.
 * @return string HTML attributes.
 */
function ea_amp_class( $default, $active, $state ) {
	$output = '';
	if( ea_is_amp() ) {
		$output .= sprintf(
			' [class]="%s"',
			esc_attr(
				sprintf(
					'%s ? \'%s\' : \'%s\'',
					$state,
					$default . ' ' . $active,
					$default
				)
			)
		);
	}
	$output .= sprintf( ' class="%s"', esc_attr( $default ) );
	return $output;
}

/**
 * Add the AMP toggle 'on' attribute.
 *
 * @param string $state State to toggle.
 * @param array $disable, list of states to disable
 * @return string The 'on' attribute.
 */
function ea_amp_toggle( $state = '', $disable = array() ) {
	if( ! ea_is_amp() )
		return;

	$settings = sprintf(
		'%1$s: ! %1$s',
		esc_js( $state )
	);

	if( !empty( $disable ) ) {
		foreach( $disable as $disableState ) {
			$settings .= sprintf(
				', %s: false',
				esc_js( $disableState )
			);
		}
	}

	return sprintf(
		' on="tap:AMP.setState({%s})"',
		$settings
	);

}

/**
 * AMP Nav Dropdown toggle and class attributes.
 *
 * @param string $theme_location Theme location.
 * @param int    $depth          Depth.
 * @return string The class and on attributes.
 */
function ea_amp_nav_dropdown( $theme_location = false, $depth = 0 ) {

	$key = 'nav';
	if( !empty( $theme_location ) )
		$key .= ucwords( $theme_location );

	global $submenu_index;
	$submenu_index++;
	$key .= 'SubmenuExpanded' . $submenu_index;

	if( 1 < $depth )
		$key .= 'Depth' . $depth;

	return ea_amp_toggle( $key ) . ea_amp_class( 'submenu-expand', 'expanded', $key );
}
Weston Ruter says
Thanks for the great writeup!
Note that AMP used to stand for “Accelerated Mobile Pages”. It is no longer an acronym, as it is no longer just about mobile but about the web regardless of device. Read more at AMP Conf 2019: Successful web experiences for everyone and AMP as your web framework. Case in point: your site is AMP-first, so I’m looking at an AMP page in my desktop browser.
AMP is both a subset and a superset of HTML. The AMP validator spec limits some things (like custom scripts and excessive CSS) but it also provides new capabilities in the form of components which are implemented using Custom Elements. So AMP is a web framework that is built with open web technologies.
By the way, work is underway to allow custom JavaScript via the
amp-scriptcomponent, but it won’t mean you’ll be able to just throw any jQuery code at it. It will have restrictions as well, and it is best considered an escape hatch (likeamp-iframe) when existing AMP components aren’t able to achieve the desired interactivity.Also there is no requirement to access AMP content via an AMP Cache. I am reading your article, an AMP document, on your canonical domain: billerickson.net. An AMP Cache is an extra layer on top which further improves performance and privacy when prerendering AMP documents served by a service like Google Search, Bing, Pinterest, etc. In order for any AMP page to appear on an AMP Cache, it must be accessible to any browser on your own origin.
Note that this CSS manifest HTML comment does not always appear: if there was no excessive CSS, then it will be hidden by default. The data in this comment should eventually be moved to the Validated URL screen so that it can be presented in a much better way. See #2169.
By default the AMP plugin is configured to automatically sanitize validation errors, meaning custom JavaScript would be stripped from the page in order to make it a valid AMP page. This leaves the page behaving the same way as if JavaScript is turned off in the browser, and in fact the AMP plugin unwraps any
noscriptelements so that any no-JS fallback content gets served in AMP pages by default.However, you can turn off auto-accepting sanitization or manually go to reject a validation error from sanitizing the invalid AMP markup. In native mode the result is that the page will have the `amp` attribute removed from the root HTML element in order to prevent Google Search Console from complaining about AMP invalidity, but the page would be an AMP page for all intents and purposes except for the invalid markup that you opted to not strip out. This will likely be the default behavior for when excessive CSS happens as well, since removing CSS can result in the page looking very broken. See #2326. Work is also underway to use AMP components in a standalone way without being in an otherwise AMP document: this is project is called Bento AMP.
In the end, whether it’s a valid AMP page or a page that uses AMP components, it’s still just a webpage: HTML, CSS, and JavaScript.
This is exactly the hope! The goal is not only for AMP to accelerate the browsing of webpages, but also to accelerate the development of webpages. Again, see AMP as your web framework.
For more on this, see docs for
amp-bind. See also the playbook for Toggling Hamburger Menus.See also the playbook for Navigation Sub-menu Buttons.
By the way, if you want to add syntax highlighting for your code blocks (other than the Gists), consider my forked Server-Side Code Syntax Highlighting Block plugin.
Bill Erickson says
Wow, thank you for the detailed reply!
I’m going to start digging into these resources.
Weston Ruter says
I forked your helper functions Gist to make a few improvements that you may want to consider: https://gist.github.com/westonruter/ed555628dfc580ce725c6599b69cc4f9
I have not tested the changes! But I think they make the code more readable and robust.
Bill Erickson says
Thank you, I’ve updated the snippet with the readability improvements
Sangam says
I am having problem embedding gist codes into my website. Small codes shows correctly but longer (number of lines) codes are only showing half. I am using
. I tried increasing height but that didn’t work. How you embeds gist in your site? It will be really useful.
Bill Erickson says
I have GistPress installed which adds oEmbed support for Gists. I then use the “Embed” block and paste in the Gist URL.
But now that my site is AMP compatible I’m moving away from Gists and including the code directly in my site using the Code block. I use the Syntax Highlighting Code Block plugin so the code is more readable.