This tutorial is designed for intermediate developers. It will get you started, but you’ll need to tweak the template files to your own needs.
A few of the StudioPress child themes include a portfolio page, like Modern Portfolio and Jane. But what if you’ve found a theme you want and it doesn’t include this feature?
It’s actually not that difficult to add to any theme. And even if your theme already includes it, this plugin-based approach will ensure your portfolio will keep working when it comes time to change themes.
An Integrated Approach
Just like Event Calendar Integration, this is a feature that should be built using a plugin and your theme.
The plugin contains the functionality: registering a “portfolio” post type, a “portfolio categories” taxonomy, any necessary metaboxes…all of the backend features that should be theme-independent and stay with you when you change themes in the future.
The theme is responsible for styling how the portfolio looks. If you don’t make any changes to your theme, the portfolio will look like another blog (because it will inherit the styling from that section). In the future if you change themes, you’ll want to update the design of that theme with regards to your portfolio.
Set up the backend
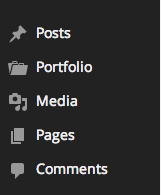 Install the Portfolio Post Type plugin. This will add a “Portfolio” post type below your “Posts”.
Add your portfolio items, making sure to add images for each one so the layout looks good in the next step.
If you go to yoursite.com/portfolio, you’ll see all your portfolio items showing up but it looks like a blog – just title and post content.
Styling your Portfolio
Create a theme file called archive-portfolio.php and place it in your child theme. Place this code in it:
| <?php | |
| /** | |
| * Portfolio Archive | |
| * | |
| */ | |
| /** | |
| * Display as Columns | |
| * | |
| */ | |
| function be_portfolio_post_class( $classes ) { | |
| global $wp_query; | |
| if( !$wp_query->is_main_query() ) | |
| return $classes; | |
| $columns = 3; | |
| $column_classes = array( '', '', 'one-half', 'one-third', 'one-fourth', 'one-fifth', 'one-sixth' ); | |
| $classes[] = $column_classes[$columns]; | |
| if( 0 == $wp_query->current_post % $columns ) | |
| $classes[] = 'first'; | |
| return $classes; | |
| } | |
| add_filter( 'post_class', 'be_portfolio_post_class' ); | |
| // Remove items from loop | |
| remove_action( 'genesis_entry_header', 'genesis_post_info', 12 ); | |
| remove_action( 'genesis_entry_content', 'genesis_do_post_content' ); | |
| remove_action( 'genesis_entry_footer', 'genesis_entry_footer_markup_open', 5 ); | |
| remove_action( 'genesis_entry_footer', 'genesis_post_meta' ); | |
| remove_action( 'genesis_entry_footer', 'genesis_entry_footer_markup_close', 15 ); | |
| /** | |
| * Add Portfolio Image | |
| * | |
| */ | |
| function be_portfolio_image() { | |
| echo wpautop( '<a href="' . get_permalink() . '">' . genesis_get_image( array( 'size' => 'medium' ) ). '</a>' ); | |
| } | |
| add_action( 'genesis_entry_content', 'be_portfolio_image' ); | |
| add_filter( 'genesis_pre_get_option_content_archive_thumbnail', '__return_false' ); | |
| // Move Title below Image | |
| remove_action( 'genesis_entry_header', 'genesis_entry_header_markup_open', 5 ); | |
| remove_action( 'genesis_entry_header', 'genesis_entry_header_markup_close', 15 ); | |
| remove_action( 'genesis_entry_header', 'genesis_do_post_title' ); | |
| add_action( 'genesis_entry_footer', 'genesis_entry_header_markup_open', 5 ); | |
| add_action( 'genesis_entry_footer', 'genesis_entry_header_markup_close', 15 ); | |
| add_action( 'genesis_entry_footer', 'genesis_do_post_title' ); | |
| genesis(); |
The first secton of code is breaking the portfolio into columns. Change the
$columns = 3 to however many columns you want (2-6). If your portfolio is not showing up in multiple columns, your theme might be missing the Column Classes CSS. Go to that link and copy/paste the CSS to your style.css file.
The second section is removing items we don’t want showing up in the loop. I’m removing the post info (date and author at top), post content, and post meta (categories at bottom). I’m also removing the markup for the entry’s footer since we no longer have a footer.
The third section is adding an image to replace the post content. I’m using the medium image size, which you can manage in Settings > Media. You might also consider creating your own image size in functions.php.
The fourth section moves the post title below the featured image.
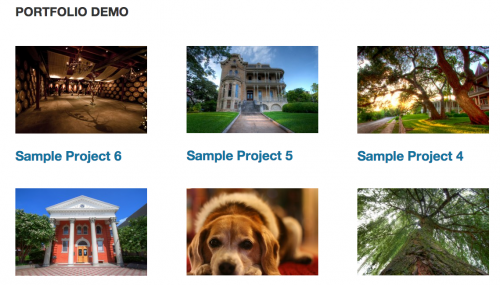
With that in place, you should have a pretty good portfolio set up. You might want to do some additional styling or changes to the template file, but now you have a starting point. Here’s what it looks like on my demo site:
Use same template for taxonomies
The plugin includes Portfolio Categories and Portfolio Tags taxonomies. You could duplicate the template file into taxonomy-portfolio_category.php and taxonomy-portfolio_tag.php, but that means if you make changes in the future you’ll need to update 3 files.
A cleaner approach is to put this in functions.php:
| <?php | |
| /** | |
| * Portfolio Template for Taxonomies | |
| * | |
| */ | |
| function be_portfolio_template( $template ) { | |
| if( is_tax( array( 'portfolio_category', 'portfolio_tag' ) ) ) | |
| $template = get_query_template( 'archive-portfolio' ); | |
| return $template; | |
| } | |
| add_filter( 'template_include', 'be_portfolio_template' ); |
That tells WordPress “if we’re on either the portfolio category or portfolio tag taxonomies, use the portfolio archive template file”.
Ordering projects
Right now the projects are showing up in reverse chronological order – the most recently published are at the top. But since this is a portfolio, you might want to put your most impressive projects at the top, regardless of post date.
Add this to your functions.php file:
| <?php | |
| /** | |
| * Add 'page-attributes' to Portfolio Post Type | |
| * | |
| * @param array $args, arguments passed to register_post_type | |
| * @return array $args | |
| */ | |
| function be_portfolio_post_type_args( $args ) { | |
| $args['supports'][] = 'page-attributes'; | |
| return $args; | |
| } | |
| add_filter( 'portfolioposttype_args', 'be_portfolio_post_type_args' ); | |
| /** | |
| * Sort projects by menu order | |
| * | |
| */ | |
| function be_portfolio_query( $query ) { | |
| if( $query->is_main_query() && !is_admin() && ( is_post_type_archive( 'portfolio' ) || is_tax( array( 'portfolio_category', 'portfolio_tag' ) ) ) ) { | |
| $query->set( 'orderby', 'menu_order' ); | |
| $query->set( 'order', 'ASC' ); | |
| } | |
| } | |
| add_action( 'pre_get_posts', 'be_portfolio_query' ); |
You can now use the “Page Attributes” box in the right column when editing a portfolio item to set the order, or install a plugin like Simple Page Ordering which will let you drag them around from the main portfolio edit screen.
Tim says
Thanks… so, how can I tell what the priorities are of all the elements in a Genesis theme?
Bill Erickson says
You have to look in the Genesis files to find where that function is added. For instance, here’s the relevant code in /lib/structure/post.php: https://gist.github.com/billerickson/6682e91b3b8e9df592f7
Nelson says
Hey Bill,
This is the layout I’d like to add on my blog page. However I have a hard time understanding the first section of code.
I dont understand this first statement. What is main query function is that a post? what classes it will return if that statement is true?
global $wp_query;
if( !$wp_query->is_main_query() )
return $classes;
I understand the the array but i dont understand why there is a empty string and how that will connect to the variable $classs
$column_classes = array( ”, ”, ‘one-half’, ‘one-third’, ‘one-fourth’, ‘one-fifth’, ‘one-sixth’ );
$classes[] = $column_classes[$columns];
how this last statement works?
if( 0 == $wp_query->current_post || 0 == $wp_query->current_post % $columns )
$classes[] = ‘first’;
return $classes;
Bill Erickson says
The is_main_query() method on the $wp_query object checks to see if this is the main query on the page. The “main query” is whatever WordPress things the content on the page should be. For instance, on a single page it would be the query for that page’s content. On a category archive it’s the query for the posts in that category.
The function in question, be_portfolio_post_class(), runs on the ‘post_class’ hook. This lets you modify the classes that are applied to the post.
The first chunk of code you mention can be read as “if this is not the main query, return the classes unmodified”. This is called “returning early” – the rest of the function only runs if the specific conditions under which we want to modify the classes is met (in this case, if this is the main query).
The second chunk of code you mention is where we add the appropriate column class to the post. The number of columns will be 2, 3, 4, 5, or 6. So I created a $column_classes array where the key matches the value of the class we want applied. A 2 column listing would be $column_classses[2], which is ‘one-half’. The two empty strings in the array are for $column_classes[0] and $column_classes[1] which don’t require column classes.
The third chunk of code adds a class of ‘first’ to the first post in each column. It can actually be simplified, so I’ve updated it to just say
if( 0 == $wp_query->current_post % $columns ). We take the current post count in the loop (it starts at 0), divide it by the number of columns, and if the remainder is 0 we add a class of “first” to it. So on a 2 column grid with 4 posts, the first post (current_post = 0) and the 3rd post (current_post = 2 ) will get the ‘first’ class added because both of those numbers divided by 2 have a remainder of 0.Ericka Watson says
Thank you for the tutorial; I am pleased with the results. Can you please tell me how to remove the post title from just the portfolio page? My images contain the title I want to use. I tried to look through all the comments and your answers, but I did not see another request for this modification.
Thank you,
Ericka Watson
Bill Erickson says
At the bottom of the archive-portfolio.php page, there’s a section labeled “Move Title below Image”. The first three lines remove the post title, and the second three lines add the title below the image. If you don’t want a title, simply remove those three lines that begin with add_action()
Ericka Watson says
Perfect! Thank you for your help.
Shiri says
hi,
i followed the instructions and it works well. however, for some reason i the portfolio has only one row. how can i change it to 3-4 rows?
in addition, ir’s not in a wide page template – how can i change it to be in a wide template?
this is the link – http://dev.wpinheb.com/modern-studio/portfolio/
thanks
Bill Erickson says
You’ll need to set the number of posts per page you want in your portfolio by modifying the WP query. Add something like this to your functions.php file.
To make it full width, add this to your archive-portfolio.php template file:
add_filter( 'genesis_pre_get_option_site_layout', '__genesis_return_full_width_content' );Nick Gowman says
Hi Bill,
Many thanks for such an awesome tutorial – this has worked a treat for a relative Genesis beginner and has saved me so much head scratching!
Sorry to be cheeky, but I was wondering if there is a way to automatically order the items added to the portfolio by their name/title and also where I could go about adding in custom classes for the title etc, just for some more control over the actual look/feel.
Many thanks in advance
Nick
Bill Erickson says
See this tutorial on customizing the WordPress query. The short answer though is use this code. It must go in the theme’s functions.php file or a plugin. Putting it in archive-portfolio.php is too late because by the time that template has loaded, the initial query has run (that’s how it knew which template to use).
To add custom classes to the title you’d need to remove the genesis_do_post_title() function and add your own. But a simpler approach is to use the existing classes. The
.entry.type-portfolio .entry-titleto target all instances of portfolio titles (both single post and archive pages). To limit it to a specific context, look at the body classes (ex:.post-type-archive-portfolioand.single-portfolio).Nick Gowman says
Thank you very much Bill – this has worked a treat. Just to be additionally cheeky, is there a way to crop the images so that regardless what dimensions the source image is, it will always maintain a consistent grid like ratio?
Many thanks in advance
Nick
Bill Erickson says
Yes, use add_image_size() to create a new image size in your child theme. Set the width and height to whatever you’d like, and specify
trueas the third parameter, which crops the image. If you set the third parameter tofalseit would only scale down the image.Nick Gowman says
Hi Bill,
Many thanks – so I’ve tried adding
add_image_size( ‘custom-size’, 300, 300, true );
To both my functions file and then also to my ‘archive-portfolio.php’ page, but obviously know that this won’t be enough to get it to work – how do I tally up this function to the thhumbnail images in the portfolio please?
Bill Erickson says
Image sizes are only generated when the image is uploaded. If you want older posts to use the new image size, install and run Regenerate Thumbnails.
Also make sure the function displaying the image in archive-portfolio.php is using the new size:
genesis_get_image( array( 'size' => 'custom-size' ) )Nick Gowman says
Many thanks again Bill 🙂
Nick Gowman says
Hi Bill
Ok I’ve added the following to my functions file:
add_image_size( ‘artist-gallery-thumb’, 300, 300, true );
and this to my archive-portfolio:
genesis_get_image( array( ‘size’ => ‘300,300’ ) ). ‘‘ );
Selected my new size (artist-gallery-thumb) within the genesis theme settings admin page and regenerated all my thumbnails, but still no resize/success – am I doing something else wrong?
Apologies if this is a trivial question and really appreciate the help
Bill Erickson says
For the size you need to specify the image size’s name. Change it to:
genesis_get_image( array( 'size' => 'artist-gallery-thumb' ) );Nick Gowman says
Hi Bill,
Many thanks again for your assistance – this is all working very well for me.
Just to ask one more cheeky question if I may – If I wanted to add a style to the ouput of the thumbnails, so I could add in some CSS transitions on hover (like an opacity change/overlay) etc, how would I go about adding a class to the thumbs please?
My plan being that the thumbs could possibly fade to a semi-opaque black and then move the title of the portfolio item to sit in the centre of the thumbnail.
Many thanks again, I really appreciate your advice and guidance
Nick
Bill Erickson says
There’s two ways you can approach this:
1) Use the existing classes to style images in the portfolio.
2) Add a new class to the images in the portfolio.
Personally I think #1 is simpler. Look at the
<body>tag to see existing classes. You should see something like.post-type-archive-portfolio. If you’re using the same template for custom taxonomies, add a function to add a custom body class.If you want to modify the classes applied to the featured image, use the
genesis_attr_entry-imagefilter like this: https://www.billerickson.net/code/genesis-featured-image-classes/Nick Gowman says
Hi Bill,
Many thanks for your advice – apologies, I’m struggling to get any css to take for my thumbnails.
I have a page here: http://artspaceinteriors.webkick.co.uk/portfolio/ where I have a two column layout and the idea being that the featured image is still used as the link, but would like the image to be a full 1/2 width and the title overlayed on top – effectively then there would be two images that cover the whole width of the page.
The overall plan being that I could then apply some css to the image to adjust the opacity on hover.
Any advice you can lend would be very much appreciated, or indeed if you have a better method that could work?
Bill Erickson says
https://gist.github.com/billerickson/55ce606369e39d0eb98e9e60ceb415c5