The Display Posts Shortcode plugin lets you display a list of posts based on any criteria. By default it displays titles only. The example below makes it display the post’s title and full content.
A hybrid WordPress theme uses theme.json to define styles and customize the block editor while also using traditional PHP template files. Hybrid themes leverage the block editor for content but not for building the theme itself. Block themes use the new Site Editor for building and customizing the theme directly in the block editor. BE Starter is a free starter theme to help you build hybrid WordPress themes. At CultivateWP we’ve built hybrid themes since before the block editor officially shipped in WordPress 5.0, and have built hundreds of hybrid themes for clients. We have an internal starter theme we use on all projects, which is continually updated with new features, improvements, and fixes with each major WP release. BE Starter is a copy of our Cultivate Starter theme, but without all the food-blogger-specific functionality. By the way, we’ll be growing our development team soon, so if you enjoy working on hybrid WordPress themes, let me know! We use a fully tokenized design process so every key in theme.json maps to a Figma design token. The designers will customize the tokens to create a site’s style guide (ex: change all the brand colors, tweak the box shadows, adjust the font sizes). As they design the site, everything will be styled using these tokens. When it’s time to develop the site, the developer customizes the theme.json file based on the settings in Figma Design Tokens. Then it’s simply a matter of styling elements with the appropriate tokens. For instance, h1 might use the “Colossal” font size while h2 uses “Huge”. If custom font families are required, we’ll use a slug of “primary” and register them like this. This Google Webfonts Helper is really useful for downloading the font files. We try to use primary/secondary/etc instead of overly-specific names for colors and font families so that when we redesign a site, we don’t end up with something like We use a contrast checker to determine which brand colors should use “foreground” (a dark color) or white as the text color. Make sure you edit _blocks-core.scss and include any colors here that should use white text. Use the I have another article that goes into more detail about building ACF blocks with block.json. The starter theme will make it even easier for you to create these blocks: Most of your blocks will only need a block.json file to register the block, a render.php file for the markup of the block, and a style.css file to style the block. If you have additional code you need to load, you can create an init.php file which will be loaded on the init hook with a priority of 5. For instance, in the social links block I’ve included in the starter theme, the init.php file has a function for retrieving all of the site’s social links from Yoast SEO. The blocks built in this method are totally self-contained. When it’s time to redesign a site, you can copy the entire /blocks directory to the new theme and everything will just work. The blocks are styled with standard CSS (no SASS compiling) and CSS variables generated from the theme.json file. Ex: The block’s CSS file does not pass through WordPress’ filter to auto-prepend them with We use “block areas” to bring the block editor to global areas of the site (ex: sidebar, after post). While you could use block-based widget areas in a similar way, I prefer a CPT because we add an admin body class of The theme includes a custom post type called “Block Areas” which appears under the Appearance section of the WP backend. It includes an ACF field group for linking a block area post to a theme-registered block area (sidebar, after-post, before-footer, 404). To create the sidebar block area: You can add/edit/remove the registered block areas in inc/block-areas.php. To display a block area in your theme, use Here’s a guide with more information on the SASS Compile Setup. Once you have the theme set up in your local environment, run When you’re ready to commit your changes to a repo or push the theme live, you can run Include your SVG files in assets/icons/utility or create additional icon folders (ex: assets/icons/category). I recommend using svgo or SVGOMG to minify and clean them up. Make sure the SVGs do not have a width and height attribute, but instead use the viewBox, and have the same width and height (ie: square artboard). Example: You can display these icons using the In addition to making it easy to load inline SVGs, this function includes smart caching to minimize the page load time. Let’s say you have a heart icon that appears next to every post title on an archive page to save it. If you were to use an inline SVG, you’d load the full markup of that SVG every time that SVG appears. Instead, when you call the “heart” icon with be_icon() it outputs If you have a complicated SVG that is having issues displaying with this smart caching (usually because it has its own IDs inside it) you can include See the be_icon() function for all the available settings. Inside the editor.js file we’re unregistering a lot of core WP blocks that are related to full site editing. Inside inc/login-logo.php you can customize the The hybrid theme approach has radically improved our design and development process. Our new Cultivate Pro service is only possible because of theme.json, Figma design tokens, and self-contained, reusable ACF blocks. We’re able to build a fully custom WordPress theme in 8-12 hours rather than the 30-40hrs it used to take. Clients love how deeply integrated the block editor is in our themes. The color palettes use their brand colors, the font sizes and families use their style guide, and they’re able to edit all the content on the site – from simple posts, to the homepage, to the sidebar – using the block editor. I’m excited to explore Full Site Editing and watch it mature over the next few years, but our team will be using hybrid WordPress themes for client work for the foreseeable future. ACF 6.0 includes a major improvement to the way blocks are built. It now supports using block.json, which aligns with WordPress core’s preferred method for block registration. Why is this important? As WordPress ships new features for blocks, you can start using them right away. Blocks are registered “the WordPress way” so support all WP core features. You don’t have to wait for ACF to add support for a new feature. What does this mean for my older blocks? Blocks built using acf_register_block_type() will continue working exactly as expected, and there’s no need to go back and update older code. I recommend using the new method for all future blocks though. To start using this today, you’ll need to log into your ACF account and download the latest release candidate. If you’re having problems with your blocks not showing up, first make sure you’re on ACF 6.0, then run your block.json file through a JSON validator to see if there are any issues. Unfortunately there’s no error messages when you have a typo in your JSON file. Table of Contents Each block will have a block.json file, so it works best to have a directory for each block. I recommend creating a /blocks/ directory in your theme or plugin to hold them. Create a block.json file in your block-specific folder. Example: /blocks/tip/block.json Most of this will line up with settings for acf_register_block_type(), but there are some important things to note: For the If you need to load a JavaScript file along with your block, use the Make sure you also register that script and specify any dependencies. If you are leveraging the ACF JS API ( ex: If you use a namespace other than “acf/” you need to use the full block name in the callback, so: The This will load the actual CSS directly in the document’s head. This means the CSS file is not loaded as a separate request, decreasing the initial page load time (pro), but also that the CSS file isn’t browser cached, slightly increasing the subsequent page load time (con). Place your style.css file inside the block directory (ex: /wp-content/themes/my-theme/blocks/tip/style.css). This will run Quick rant about styles: If you are using a FSE theme (“block theme”) then the style loading will work exactly as you expect. The CSS files and inline styles will only load if that page contains the block. If you’re like me and building “classic” PHP based themes, WordPress loads every registered block style in the header, regardless of whether that block exists on the page. You can use the The WP core argument (as I understand it) is that we don’t know exactly which blocks are on the page currently. They could be in the post content, or in reusable blocks, or in block-based widget areas, or other block-based features. While that is all true, I would’ve preferred loading the CSS files we do know are in the post content in the header and loading any missing ones in the footer. I had built my own CSS loader that figured out which blocks appeared on the page, but now I opt for using WP Rocket to strip unused CSS from the page. If you need to load a JavaScript file along with your block, use the Make sure you also register that script and specify any dependencies. If you are leveraging the ACF JS API ( ex: If you use a namespace other than “acf/” you need to use the full block name in the callback, so: You can specify a Dashicons icon to use, or include an actual SVG: ACF Specific settings will go in this array. Use Use Alternatively, you can use Use Use In this example, the only feature this block supports is a background color: You can set the default attributes for the block features. For instance, if the block supports a background color, you can have that block use the For more information, see the Block Editor Handbook article on Metadata in block.json. You should now have a folder in your theme/plugin with block.json, style.css, and render.php. The next step is to tell WordPress about your block using In your plugin or theme’s functions.php file, add: That’s it! Now your custom block should be accessible in the block editor. While the above works as a basic example, there are some ways we can improve this: Here’s the code I use in my themes, followed by a description of what it’s doing. My The code does the following for each block: Ask ACF Support 🙂. I’m closing comments on this post because I likely won’t have time to answer questions & troubleshoot issues, but ACF’s support team is excellent and very responsive. I’ll also update this post with more information and resources as I find them. The core WordPress blocks like button and group all share a global color palette. This saves a lot of time because you don’t have to style many variations of each block – every block with a class of If you’re using theme.json, this becomes even more powerful because you can customize the color palette on a per-block-type level. At CultivateWP we build a lot of custom blocks with ACF. In the past, when we needed the global color palette we would either wrap our custom block in a group block that had the color styling, or use Matt Whiteley’s guide on syncing ACF colors with the Gutenberg palette. But Matt’s approach doesn’t work with theme.json. A developer on our team (Chris Brailsford) just found a better way. When registering a new block with To add support for the color feature, add This adds support for both the Background Color and Text Color fields. For more control, you can pass an array to specify which of those two fields should be displayed. Selecting a color from the palette adds a class to your block for styling. This automatically works in the backend because the block editor adds the class for you, but you’ll also need to update your block markup to add the class on the frontend. Inside your block template file, check for When you upload a favicon image in the WordPress customizer, it provides a helpful preview to see how your favicon will appear in browsers using light or dark mode. When the favicon color doesn’t work well with dark mode, a common fix is to replace the transparent PNG with a JPG that has a white background, but then you end up with a white square in dark mode. Alternatively, you can use an SVG for the favicon and modify the favicon styling based on the color scheme. You can see this in use in the recent NerdPress redesign we just launched. Create a square SVG with your desired icon. It will look something like this: Remove any styling from the shapes in the SVG (so the You can use I added my favicon.svg to my theme’s Add the following code to your theme’s functions.php file to include the SVG favicon. It seems that the SVG favicon is prioritized over the WP generated one regardless of whether it appears before or after it in the page markup, but I have the priority set to 100 so it will appear after, just in case. Even with this approach, you should upload a JPG version of the favicon in the WordPress customizer. There are still many browsers that don’t support SVG favicons so you’ll want a fallback. My favorite new feature in Advanced Custom Fields 5.9 is support for InnerBlocks. This allows you to insert any block (core or custom) inside your ACF block. Rather than having to create your own fields for Title, Content, and Button in your custom block, you can simply insert Table of Contents When registering your ACF block, include In your template partial for the block, include It’s helpful to fill the InnerBlocks field with default content so the block looks correct when first inserted. We’re building a new site for Nice Kicks, and they often need to highlight the release date and details for new sneakers. We built a Release Info block that uses InnerBlocks for the content area. Rather than just having an empty white box when they first insert the block, we pre-populate it with default content using a block template. Inside the block’s template file, create a You can find the available block attributes in a blocks.json file for each block in wp-includes/blocks. In the above example we set the starting content for the block. If you were to publish the post without changing the text, the default content would appear in the blocks. Alternatively, you can use the I had two issues with placeholders, which is why I used default content instead: To use placeholders with the above example, change the And this was the result: You can limit which blocks can be inserted into your InnerBlocks field using the Using the example above, I can limit the Release Info block to only include the heading and paragraph blocks: You can also limit the flexibility by locking the template. Adding Adding I recently built an Icon Heading block. The icon can be selected in the block settings sidebar using a dynamic dropdown field. I used InnerBlocks for the heading itself so it would have all the standard options for customizing the heading (change block style, change heading type to h3). I used While I try to support all the core blocks in the themes I build, sometimes it makes sense to remove a few. Typically it’s because I built a custom block that’s similar to a core block while addressing the design and functional requirements of the theme. Most of my themes include a “Content and Image” block that’s similar to the “Media & Text” block but it uses the theme’s grid layout. Sometimes I’ll unregister the “Search” block and create my own that uses the You can use the I also enqueue any custom fonts used on the frontend so I can also use them in the editor styles. Now that you’ve created an editor.js file and enqueued it into the block editor, you can use Here’s a list of all the core block types. The above code only unregisters the block from the “Edit Post” screen. If you’re trying to remove blocks from the Widgets screen, Full Site Editor, or Template Parts, you’ll need to adjust the dependencies. Please refer to Jason Lemahieu’s article for more information: How to Unregister WordPress Blocks (from everywhere!) How often do you write My I was looking to see which attributes are included in the This displayed all the gallery block information on the right side of the screen: I include this in a mu-plugin locally so it only runs in my development environment, but you could also add it to a plugin or your theme’s functions.php file. I’m searching for a WordPress Developer to help us build custom WordPress themes and support our clients. This is the perfect role for a WordPress developer with limited freelance work experience. In addition to mastering our development approach, you’ll learn our sales process, participate in client calls, and receive personal coaching from me. I’ll consider both part-time and full-time applicants, and we’d start working together in August or September. We are a collective of independent designers and developers working together to help publishers grow and thrive. We’re currently a team of four: two designers (Duane Smith and Andrew Pautler) and two developers (myself and Richard Buff). We build custom WordPress themes focused on performance, user experience, accessibility, scalability, and SEO. We do this to help publishers express their brand, grow their audience, and thrive in their marketplace. If this opportunity sounds interesting to you, then please submit an application by July 11th. Please clearly include the following in your cover letter: Note: The application period is now over. A custom honeypot is a simple and effective way to eliminate spam. If a hidden field in your form is filled in, you can be fairly confident the submission is spam. WPForms does include a built-in honeypot, but now that the plugin is used on millions of sites, most spam bots have been updated to identify and skip the WPForms field with a name of Your custom honeypot is different. It’s unique to your form and looks like any other field to a bot. I have pretty much eliminated spam on my contact form with a custom honeypot. First, come up with a unique CSS class name you’ll use to identify your honeypot field. Make it something unique to your site (ie: not Create a field in your form and add your custom class to it. Add the following code to your theme’s functions.php file or a Core Functionality plugin. If this field is ever filled in, the submission will be marked as spam and have a honeypot message of “[Custom honeypot]”. Make sure you update the You can also enable logging so you can see if the honeypot is working. Every time a spam entry is submitted, this will create a post in the wpforms_log post type with the honeypot message and the full submission. I recommend only logging this data temporarily because you don’t want to fill up your database with a bunch of unimportant spam messages. First, update the Use this code to make the WPForms Log post type visible. You can then access it in WPForms > Logs. SpinupWP is a modern cloud-based server control panel. It gives you the features of a managed WordPress host on your own low-cost and scalable Digital Ocean servers. It’s a great choice for production sites, and I host many of my personal sites there. It also makes an excellent development environment. My development server requirements are: I’m currently using a $15/month droplet with 3GB of memory and 60GB of storage. When you add in the $9/month for SpinupWP, my total hosting bill of $24/month is less than most managed WordPress hosts for a single site. If you sign up for SpinupWP using the link below, you’ll get a $50 credit added to your account after 30 days. I use git to version control the custom themes I develop. When I’m ready to push my local changes to the server, I type For my clients hosted with WPEngine or BigScoots, I use their built-in staging environments and git-based deployment. For more information, see my articles on git for WPEngine and git for BigScoots. If a client is hosted elsewhere, I use SpinupWP to replicate the same git push development workflow and features. Once you have your SpinupWP server setup, it’s easy to add new sites. I have a domain I use for development sites, with each site being setup as a subdomain. Log into the SpinupWP Dashboard and click the “New Site” button. Create a fresh WordPress install (here’s a guide). Install WP Migrate DB Pro along with the Media and Theme & Plugin addons on the production site and the new development site. Pull a copy of the database, media, themes, and plugins to your dev server. Alternatively, you can copy the site files over via SSH. In your local environment, add the remote: A lot of the sites I build have massive uploads directories. To save local hard drive space and simplify database syncing, I don’t pull any of the media down locally. I’ll use Migrate DB Pro to pull down a local copy of the database, theme and plugins. I’ll then install BE Media from Production and use it to source media from the development server. You can install and set it up with wp cli: One of the first things I do when building a new theme is determine all the required image sizes. After adding the relevant Likewise, if I need to upload new images, I push the database to staging, upload the image on staging, then pull a fresh copy of the database locally.
Starter theme features
Define colors and styles with theme.json
.has-blue-background-color { color: red; }settings.custom.layout section of theme.json to set:
content is the content area width used for Content and Content Sidebar layouts. It’s also used for the content width inside of a group blockwide is the site’s max width used in the site header, site footer, the content area for the “Full Width Content” layout, and the “wide” alignment optionsidebar is the sidebar widthpadding is the left/right padding on the content areablock-gap is the space between blocks (ex: paragraphs and headings)block-gap-large is the top/bottom padding on full width groups with a background color, top/bottom margin on separator block, top/bottom padding on site-inner, and in a few other places that need a larger space than block-gap.Build custom blocks using ACF and block.json
block-{block name} if a style.css file exists in the block’s folderbackground: var(--wp--preset--color--primary);.editor-styles-wrapper so you may need to add that class on your own for editor specific styling.Block Areas for additional editable content
.block-area-{block area name} and can adjust the content width to match how it will render on the frontend, so the “Sidebar” block area is 336px wide.
settings.custom.layout.sidebar in theme.json).Block_Areas\show( $block_area_name ).SASS compiled using Node.js
npm install to install the SASS package. You can then run npm run sass-dev to automatically compile expanded CSS as changes are made to the SASS partials.npm run sass-prod which compiles minified CSS.Use
be_icon() for loading inline SVGs<svg xmlns="http://www.w3.org/2000/svg" viewBox="0 0 24 24">be_icon() function. For instance, if you want to display a 24×24 facebook icon, use be_icon( [ 'icon' => 'facebook', 'size' => 24 ] );<svg><use href="#utility-heart"></use></svg> and then loads the heart icon once in the site footer with that ID.'force' => true to skip this and load the full markup inline.Full Site Editing blocks have been removed
Login Logo
$logo_path, $logo_width, and $logo_height variables, and it will update the logo on the WP login page for you.
Summary
Create a block.json file
{
"name": "cwp/tip",
"title": "Recipe Tip",
"description": "",
"style": "file:./style.css",
"script": "",
"category": "cultivatewp",
"icon": "carrot",
"apiVersion": 2,
"keywords": [],
"acf": {
"mode": "preview",
"renderTemplate": "render.php"
},
"styles": [],
"supports": {
"align": false,
"anchor": false,
"alignContent": false,
"color": {
"text": false,
"background": true,
"link": false
},
"alignText": false,
"fullHeight": false
},
"attributes": {
}
}
Custom prefixes in block name
name you can now specify your own prefix, instead of all blocks being prefixed automatically with acf. If you don’t add a prefix, the ACF one will be used.Script
script parameter to pass the script handle: "script": "block-tip"./**
* Register block script
*/
function cwp_register_block_script() {
wp_register_script( 'block-tip', get_template_directory_uri() . '/blocks/tip/block-tip.js', [ 'jquery', 'acf' ] );
}
add_action( 'init', 'cwp_register_block_script' );window.acf.addAction) you’ll need to include acf as a dependency.render_block_preview/type=cwp/tipStyle
style parameter lets you specify a stylesheet to include with this block. There are two ways this can be used."style": "file:./style.css""style": "block-tip"wp_enqueue_style( 'block-tip' ) to load the CSS file normally, with the opposite pros/cons listed above. Elsewhere in your theme/plugin you should have wp_register_style( 'block-tip', get_template_directory_uri() . '/blocks/tip/style.css' )should_load_separate_core_block_assets filter to tell WP to only load the ones that are required, but it waits until wp_footer to load the CSS, causing big CLS issues which makes this feature useless.Script
script parameter to pass the script handle: "script": "block-tip"./**
* Register block script
*/
function cwp_register_block_script() {
wp_register_script( 'block-tip', get_template_directory_uri() . '/blocks/tip/block-tip.js', [ 'jquery', 'acf' ] );
}
add_action( 'init', 'cwp_register_block_script' );window.acf.addAction) you’ll need to include acf as a dependency.render_block_preview/type=cwp/tipIcon
"icon": "<svg xmlns='http://www.w3.org/2000/svg' viewBox='0 0 22.5 22.5'><defs><style>.a{fill:#222;}.b{fill:#1fa8af;}</style></defs><path class='a' d='M20.17,4a10.17,10.17,0,0,0-7-3.5L11.91.38h-.18a.64.64,0,0,0-.47.13A.68.68,0,0,0,11,.93L10.6,3.79a.48.48,0,0,0,.12.43.54.54,0,0,0,.44.18h.11l1.44.17c3.94.45,6.12,2.69,5.84,6a8.37,8.37,0,0,1-2.49,5.12A8.14,8.14,0,0,1,10,18.06l-.65,0H9.15a.8.8,0,0,0-.5.17.68.68,0,0,0-.25.44L8,21.5a.49.49,0,0,0,.12.42.57.57,0,0,0,.45.18h.17l1,0h.34a11.61,11.61,0,0,0,8.21-3.39,12.76,12.76,0,0,0,3.77-7.92A9.49,9.49,0,0,0,20.17,4Z'/><path class='b' d='M9.2,17h.15L10,17a7.61,7.61,0,0,0,3.64-.77L15,6.15a8.65,8.65,0,0,0-2.33-.57l-1-.12-1,7.35L9.23,7c-.11-.45-.33-.67-.65-.67H7.16c-.29,0-.5.22-.65.67L5.1,12.81,3.82,3a.55.55,0,0,0-.61-.55H.78a.36.36,0,0,0-.29.16A.6.6,0,0,0,.37,3a.5.5,0,0,0,0,.18L2.53,19.22a1.07,1.07,0,0,0,.23.6.64.64,0,0,0,.53.23H5.16c.37,0,.61-.21.73-.65l2-7.19Z'/></svg>",ACF
mode to specify how the block is rendered in the block editor. The default is “auto” which renders the block to match the frontend until you select it, then it becomes an ACF field group editor. If set to “preview” it will always look like the frontend and you can edit ACF field group in the sidebar.renderTemplate to specify what PHP file will render this block. I typically have a render.php file in each block directory for consistency.renderCallback to specify a PHP function that will output the block’s content.Styles
styles to specify an array of block type styles. "styles": [
{ "name": "default", "label": "Default", "isDefault": true },
{ "name": "red", "label": "Red" },
{ "name": "green", "label": "Green" },
{ "name": "blue", "label": "Blue" }
],Supports
supports to specify what Gutenberg features this block supports. The default is false for all items so you don’t need to specify all the items it doesn’t support, but I typically leave them all in there marked false so I can easily toggle the ones I want to true. "supports": {
"align": false,
"anchor": false,
"alignContent": false,
"color": {
"text": false,
"background": true,
"link": false
},
"alignText": false,
"fullHeight": false
},Attributes
tertiary color by default:"attributes": {
"backgroundColor": {
"type": "string",
"default": "tertiary"
}
}
Register your block
register_block_type()./**
* Load Blocks
*/
function cwp_load_blocks() {
register_block_type( get_template_directory() . '/blocks/tip/block.json' );
// Optional - register stylesheet if using Style Method 2 from above
wp_register_style( 'block-tip', get_template_directory_uri() . '/blocks/tip/style.css' );
}
add_action( 'init', 'cwp_load_blocks' );Advanced Usage
<?php
/**
* Blocks
*
* @package CultivateClient
* @author CultivateWP
* @since 1.0.0
* @license GPL-2.0+
**/
namespace Cultivate\Blocks;
/**
* Load Blocks
*/
function load_blocks() {
$theme = wp_get_theme();
$blocks = get_blocks();
foreach( $blocks as $block ) {
if ( file_exists( get_template_directory() . '/blocks/' . $block . '/block.json' ) ) {
register_block_type( get_template_directory() . '/blocks/' . $block . '/block.json' );
wp_register_style( 'block-' . $block, get_template_directory_uri() . '/blocks/' . $block . '/style.css', null, $theme->get( 'Version' ) );
if ( file_exists( get_template_directory() . '/blocks/' . $block . '/init.php' ) ) {
include_once get_template_directory() . '/blocks/' . $block . '/init.php';
}
}
}
}
add_action( 'init', __NAMESPACE__ . '\load_blocks', 5 );
/**
* Load ACF field groups for blocks
*/
function load_acf_field_group( $paths ) {
$blocks = get_blocks();
foreach( $blocks as $block ) {
$paths[] = get_template_directory() . '/blocks/' . $block;
}
return $paths;
}
add_filter( 'acf/settings/load_json', __NAMESPACE__ . '\load_acf_field_group' );
/**
* Get Blocks
*/
function get_blocks() {
$theme = wp_get_theme();
$blocks = get_option( 'cwp_blocks' );
$version = get_option( 'cwp_blocks_version' );
if ( empty( $blocks ) || version_compare( $theme->get( 'Version' ), $version ) || ( function_exists( 'wp_get_environment_type' ) && 'production' !== wp_get_environment_type() ) ) {
$blocks = scandir( get_template_directory() . '/blocks/' );
$blocks = array_values( array_diff( $blocks, array( '..', '.', '.DS_Store', '_base-block' ) ) );
update_option( 'cwp_blocks', $blocks );
update_option( 'cwp_blocks_version', $theme->get( 'Version' ) );
}
return $blocks;
}
/**
* Block categories
*
* @since 1.0.0
*/
function block_categories( $categories ) {
// Check to see if we already have a CultivateWP category
$include = true;
foreach( $categories as $category ) {
if( 'cultivatewp' === $category['slug'] ) {
$include = false;
}
}
if( $include ) {
$categories = array_merge(
$categories,
[
[
'slug' => 'cultivatewp',
'title' => __( 'CultivateWP', 'cultivate_textdomain' ),
'icon' => \cwp_icon( [ 'icon' => 'cultivatewp', 'group' => 'color', 'force' => true ] )
]
]
);
}
return $categories;
}
add_filter( 'block_categories_all', __NAMESPACE__ . '\block_categories' );
get_blocks() function scans the /block directory and makes an array of all my blocks. I store this as an option so we only have to do this once, and use the current theme’s version to bust the cache. So when I add a new block, I also bump the version number in style.cssregister_block_type() using the block.json filewp_register_style() to register the block’s stylesheet. This will only load if the block.json file specifies a style.init.php file in the block directory, load that too. This is what I use for any additional PHP code I want to run independent of the block’s rendering.init hook with a priority of 5 so I can use the normal init (priority 10) inside my init.php file.acf/settings/load_json filter tells ACF to look in my block directories for ACF JSON field group files. Need Help?
Additional information
.has-secondary-background-color will have the same background color.Add ‘color’ support
acf_register_block_type(), you can use the ‘supports’ array to specify which block editor features this block supports. The documentation lists a few examples, but the important part is All properties from the JavaScript block supports documentation may be used. 'color' => true to the supports array.acf_register_block_type(
[
'title' => __( 'Hero', 'cwp2021' ),
'name' => 'hero',
'render_template' => 'partials/blocks/hero.php',
'category' => 'cultivatewp',
'mode' => 'preview',
'align' => 'full',
'supports' => [
'align' => [ 'full' ],
'jsx' => true,
'color' => true,
],
]
);
acf_register_block_type(
[
'title' => __( 'Hero', 'cwp2021' ),
'name' => 'hero',
'render_template' => 'partials/blocks/hero.php',
'category' => 'cultivatewp',
'mode' => 'preview',
'align' => 'full',
'supports' => [
'align' => [ 'full' ],
'jsx' => true,
'color' => [
'background' => true,
'gradients' => true,
'text' => false,
],
],
]
);Add the classes to your block
$block['backgroundColor'] and $block['textColor']. $classes = [ 'block-hero' ];
if ( ! empty( $block['className'] ) ) {
$classes = array_merge( $classes, explode( ' ', $block['className'] ) );
}
if ( ! empty( $block['align'] ) ) {
$classes[] = 'align' . $block['align'];
}
if ( ! empty( $block['backgroundColor'] ) ) {
$classes[] = 'has-background';
$classes[] = 'has-' . $block['backgroundColor'] . '-background-color';
}
if ( ! empty( $block['textColor'] ) ) {
$classes[] = 'has-text-color';
$classes[] = 'has-' . $block['textColor'] . '-color';
}
printf(
'<div class="%s"%s>',
esc_attr( join( ' ', $classes ) ),
! empty( $block['anchor'] ) ? ' id="' . esc_attr( sanitize_title( $block['anchor'] ) ) . '"' : '',
);
echo '<div class="block-hero__image">' . wp_get_attachment_image( get_field( 'image' ), 'full' ) . '</div>';
echo '<div class="block-hero__content"><InnerBlocks /></div>';
echo '</div>';
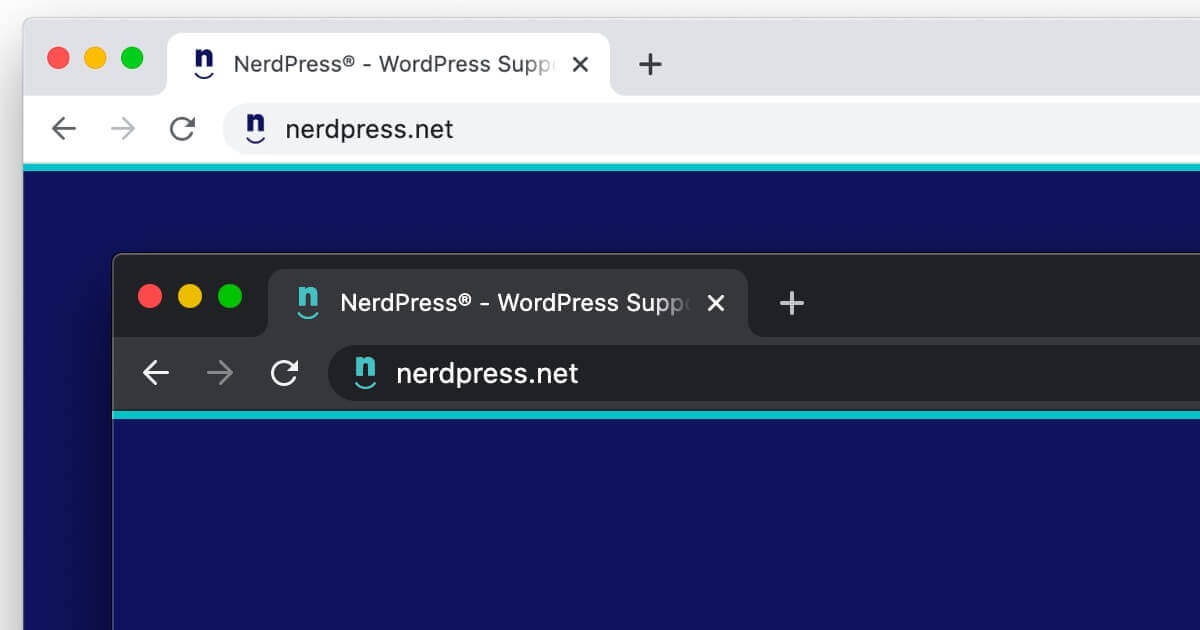
Create SVG favicon
<svg xmlns="http://www.w3.org/2000/svg" width="512" height="512" viewBox="0 0 512 512">
<path fill="#0F145B" d="......" />
</svg>fill and stroke attributes) and add those styles with inline CSS.@media ( prefers-color-scheme: dark ) to style the dark mode version differently. Here’s what my SVG now looks like:<svg xmlns="http://www.w3.org/2000/svg" width="512" height="512" viewBox="0 0 512 512">
<style>
path {
fill: #0F145B;
}
@media ( prefers-color-scheme: dark ) {
path {
fill: #43C1C5;
}
}
</style>
<path d="....." />
</svg>Add SVG favicon to your theme
/assets/images/ directory, but you can add it anywhere in your theme. /**
* SVG Favicon
*/
function be_svg_favicon() {
echo '<link rel="icon" href="' . esc_url( get_stylesheet_directory_uri() . '/assets/images/favicon.svg' ) . '" type="image/svg+xml">';
}
add_action( 'wp_head', 'be_svg_favicon', 100 );<InnerBlocks /> and use the block editor to build the content inside the block.How to use InnerBlocks
'jsx' => true in the supports array. acf_register_block_type( array(
'title' => __( 'About', 'client_textdomain' ),
'name' => 'about',
'render_template' => 'partials/blocks/about.php',
'mode' => 'preview',
'supports' => [
'align' => false,
'anchor' => true,
'customClassName' => true,
'jsx' => true,
]
));
<InnerBlocks /> where you would like the editable block area to appear. $classes = ['block-about'];
if( !empty( $block['className'] ) )
$classes = array_merge( $classes, explode( ' ', $block['className'] ) );
$anchor = '';
if( !empty( $block['anchor'] ) )
$anchor = ' id="' . sanitize_title( $block['anchor'] ) . '"';
echo '<div class="' . join( ' ', $classes ) . '"' . $anchor . '>';
echo '<div class="block-about__inner">';
echo '<div class="block-about__content">';
echo '<InnerBlocks />';
echo '</div>';
echo '<div class="block-about__image">';
echo wp_get_attachment_image( get_field( 'image' ), 'be_thumbnail_l' );
echo '</div>';
echo '</div>';
echo '</div>';
Default value for InnerBlocks
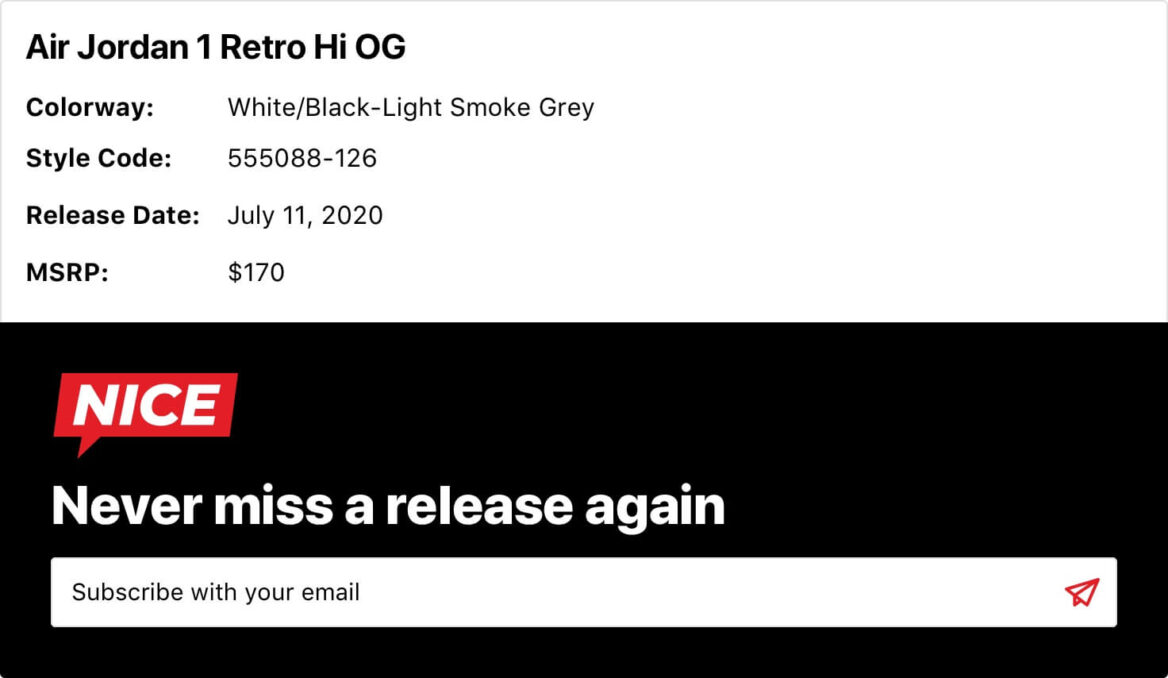
$template array detailing which blocks should be added. Update <InnerBlocks /> to include the template.$template = array(
array('core/heading', array(
'level' => 2,
'content' => 'Title Goes Here',
)),
array( 'core/paragraph', array(
'content' => '<strong>Colorway:</strong> <br /><strong>Style Code:</strong> <br /><strong>Release Date:</strong> <br /><strong>MSRP:</strong> ',
) )
);
echo '<div class="' . join( ' ', $classes ) . '"' . $anchor . '>';
echo '<InnerBlocks template="' . esc_attr( wp_json_encode( $template ) ) . '" />';
$form_id = get_option( 'options_be_release_info_form' );
if( !empty( $form_id ) && function_exists( 'wpforms_display' ) )
wpforms_display( $form_id, true, true );
echo '</div>';
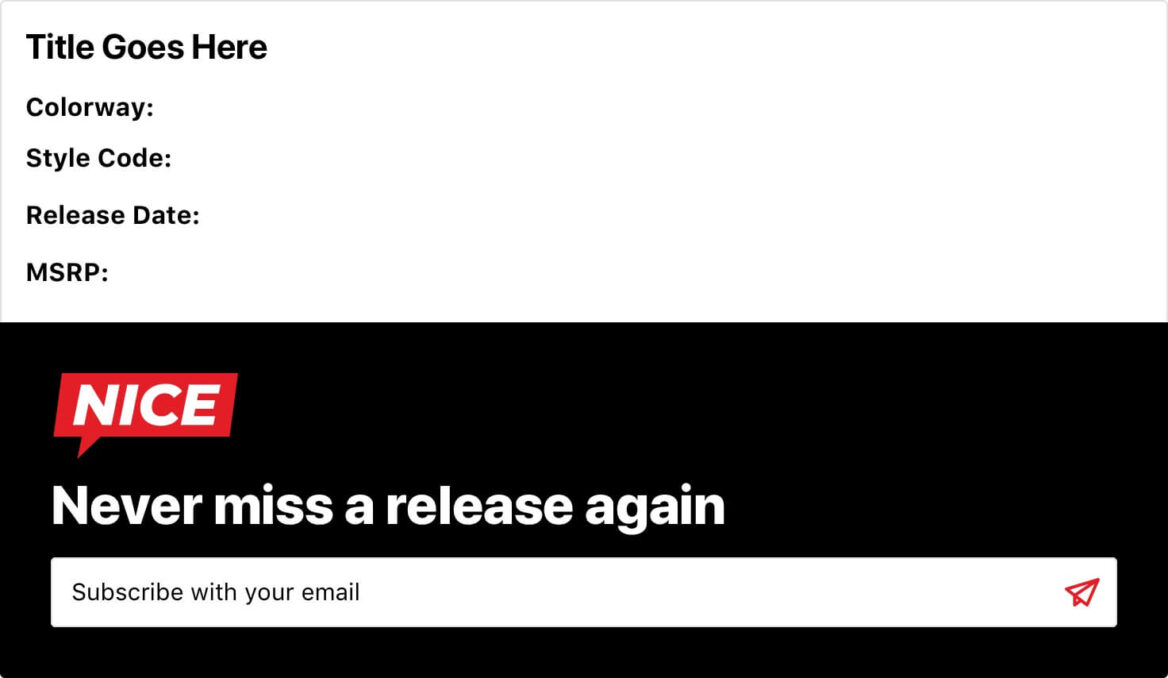
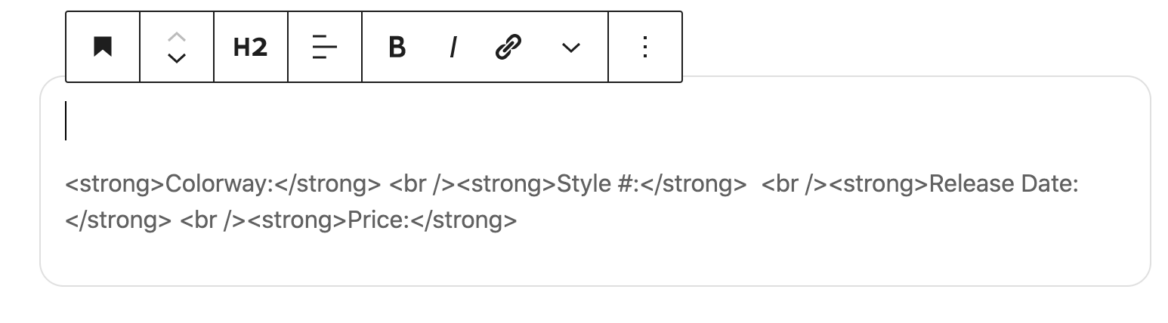
Placeholders instead of default content
placeholder parameter to specify placeholder text. This will not be published, and when you select the field the placeholder text disappears.<strong> and <br /> to format the paragraph text, but that doesn’t work with the placeholder.$template to $template = array(
array('core/heading', array(
'level' => 2,
'placeholder' => 'Title Goes Here',
)),
array( 'core/paragraph', array(
'placeholder' => '<strong>Colorway:</strong> <br /><strong>Style #:</strong> <br /><strong>Release Date:</strong> <br /><strong>Price:</strong> ',
) )
);
Limit the blocks available in InnerBlocks
allowedBlocks attribute. $allowed_blocks = array( 'core/heading', 'core/paragraph' );
$template = array(
array('core/heading', array(
'level' => 2,
'content' => 'Title Goes Here',
)),
array( 'core/paragraph', array(
'content' => '<strong>Colorway:</strong> <br /><strong>Style Code:</strong> <br /><strong>Release Date:</strong> <br /><strong>MSRP:</strong> ',
) )
);
echo '<div class="' . join( ' ', $classes ) . '"' . $anchor . '>';
echo '<InnerBlocks allowedBlocks="' . esc_attr( wp_json_encode( $allowed_blocks ) ) . '" template="' . esc_attr( wp_json_encode( $template ) ) . '" />';
$form_id = get_option( 'options_be_release_info_form' );
if( !empty( $form_id ) && function_exists( 'wpforms_display' ) )
wpforms_display( $form_id, true, true );
echo '</div>';
Template lock with InnerBlocks
templateLock="all" prevents inserting new blocks or removing/re-arranging current blockstemplateLock="insert" prevents inserting new blocks or removing current blocks, but you can re-arrange the current blocks.![]()
templateLock="all" so only the heading from my block template could be used in this block.$classes = ['block-icon-heading'];
if( !empty( $block['className'] ) )
$classes = array_merge( $classes, explode( ' ', $block['className'] ) );
if( !empty( $block['align'] ) )
$classes[] = 'align' . $block['align'];
$anchor = '';
if( !empty( $block['anchor'] ) )
$anchor = ' id="' . sanitize_title( $block['anchor'] ) . '"';
$template = array(
array('core/heading', array(
'level' => 2,
'content' => 'Heading',
)),
);
echo '<div class="' . join( ' ', $classes ) . '"' . $anchor . '>';
$icon = get_field( 'dynamic_icon_category' );
if( !empty( $icon ) )
echo '<div class="icon-heading-wrap">' . be_icon( [ 'icon' => $icon, 'group' => 'category', 'size' => 38 ] ) . '</div>';
echo '<InnerBlocks template="' . esc_attr( wp_json_encode( $template ) ) . '" templateLock="all" />';
echo '</div>';
searchform.php file in the theme, ensuring the Search block matches the design and functionality of the search form used everywhere else in the theme.Enqueue block editor assets
enqueue_block_editor_assets hook to load scripts and styles into the block editor. My themes typically have an editor.js file that I use for block styles and unregistering block types. /**
* Gutenberg scripts and styles
*
*/
function be_gutenberg_scripts() {
wp_enqueue_style( 'theme-fonts', be_theme_fonts_url() );
wp_enqueue_script( 'theme-editor', get_template_directory_uri() . '/assets/js/editor.js', array( 'wp-blocks', 'wp-dom' ), filemtime( get_template_directory() . '/assets/js/editor.js' ), true );
}
add_action( 'enqueue_block_editor_assets', 'be_gutenberg_scripts' );
/**
* Theme Fonts URL
*
*/
function be_theme_fonts_url() {
return 'https://fonts.googleapis.com/css2?family=Roboto+Slab&display=swap';
}
Unregister block type
wp.blocks.unregisterBlockType to unregister block types. wp.domReady( () => {
wp.blocks.unregisterBlockType( 'core/media-text' );
wp.blocks.unregisterBlockType( 'core/search' );
} );Unregister blocks everywhere
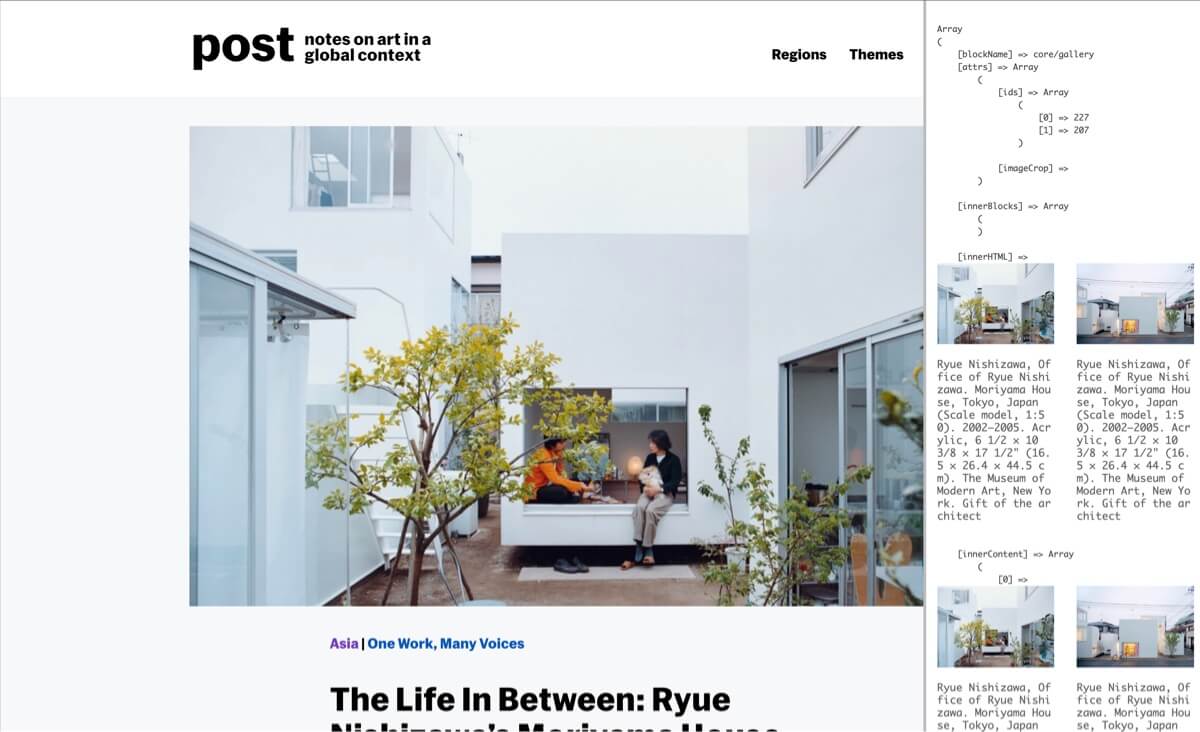
print_r( $something ) to see what’s in the variable? This works great, except it appears inline right where your code is executing. ea_pp() function works the same way, but outputs it in a console-like box attached to the right side of the screen. This pretty printing function was originally built by Chris Bratlien.Example
core/gallery block, so I added the following code to functions.php:add_action( 'wp_footer', function() {
global $post;
$blocks = parse_blocks( $post->post_content );
foreach( $blocks as $block ) {
if( 'core/gallery' === $block['blockName'] ) {
ea_pp( $block );
}
}
});
Code
/**
* Pretty Printing
*/
function ea_pp( $obj, $label = '' ) {
$data = json_encode( print_r( $obj,true ) );
?>
<style type="text/css">
#bsdLogger {
position: fixed;
top: 0;
right: 0px;
border-left: 4px solid #bbb;
padding: 6px;
background: white;
color: #444;
z-index: 999;
font-size: 1.25em;
width: 400px;
height: 100vh;
overflow: scroll;
}
.admin-bar #bsdLogger {
top: 32px;
height: calc( 100vh - 32px );
}
</style>
<script type="text/javascript">
var doStuff = function(){
var obj = <?php echo $data; ?>;
var logger = document.getElementById('bsdLogger');
if (!logger) {
logger = document.createElement('div');
logger.id = 'bsdLogger';
document.body.appendChild(logger);
}
////console.log(obj);
var pre = document.createElement('pre');
var h2 = document.createElement('h2');
pre.innerHTML = obj;
h2.innerHTML = '<?php echo addslashes($label); ?>';
logger.appendChild(h2);
logger.appendChild(pre);
};
window.addEventListener ("DOMContentLoaded", doStuff, false);
</script>
<?php
}About Us
Minimum qualifications
How to apply?
hp.
honeypot). If your class is my-fancy-field, add this to your theme’s stylesheet to hide that field..wpforms-container .my-fancy-field {
display: none;
}$honeypot_class variable at the top to use your custom class name./**
* WPForms Custom Honeypot
*
* @author Bill Erickson
* @link http://www.billerickson.net/eliminate-spam-with-a-custom-honeypot/
*
* @param string $honeypot, empty if not spam, honeypot text is used in WPForms Log
* @param array $fields
* @param array $entry
* @param array $form_data
*/
function be_wpforms_custom_honeypot( $honeypot, $fields, $entry, $form_data ) {
$honeypot_class = 'my-fancy-field';
$honey_field = false;
foreach( $form_data['fields'] as $form_field ) {
if( false !== strpos( $form_field['css'], $honeypot_class ) ) {
$honey_field = absint( $form_field['id'] );
}
}
if( !empty( $entry['fields'][$honey_field] ) ) {
$honeypot = 'Custom honeypot';
}
return $honeypot;
}
add_filter( 'wpforms_process_honeypot', 'be_wpforms_custom_honeypot', 10, 4 );Logging
wpforms_logging option to log spam:/**
* Enable logging of spam
*
*/
add_action( 'init', function() {
$debug = get_option( 'wpforms_logging' );
if( empty( $debug ) || ! in_array( 'spam', $debug ) )
update_option( 'wpforms_logging', [ 'spam' ] );
});/**
* Make log visible
*
*/
add_filter( 'wpforms_log_cpt', function( $args ) {
$args['show_ui'] = true;
unset( $args['capability_type'] );
return $args;
});
$50 credit for SpinupWP
My preferred development approach
git push staging master. I also use WP Migrate DB Pro to push/pull the database between environments.Setting up a development environment
Set up git on the server
ls should list /files and /logsgit init --bare project.gittouch project.git/hooks/post-receivechmod +x project.git/hooks/post-receivevi project.git/hooks/post-receive) and add the following to it. Make sure you update the two paths at the top to match your environment#!/bin/bash
TARGET="/sites/clientname.cultivatewp.com/files"
GIT_DIR="/sites/clientname.cultivatewp.com/project.git"
BRANCH="master"
while read oldrev newrev ref
do
# only checking out the master (or whatever branch you would like to deploy)
if [ "$ref" = "refs/heads/$BRANCH" ];
then
echo "Ref $ref received. Deploying ${BRANCH} branch to production..."
git --work-tree=$TARGET --git-dir=$GIT_DIR checkout -f $BRANCH
else
echo "Ref $ref received. Doing nothing: only the ${BRANCH} branch may be deployed on this server."
fi
donegit remote add staging ssh://[email protected]/~/project.gitLocal environment, no media
wp plugin install be-media-from-production --activate
wp config set BE_MEDIA_FROM_PRODUCTION_URL https://clientname.cultivatewp.com --type=constantadd_image_size()‘s to the theme, I’ll push the theme and database to staging and regenerate thumbnails. I can then pull a fresh copy of the database locally and have access to all the newly generated thumbnails.